


A great developer experience (devex) rests on a few simple principles: automate repetitive work, keep workflows consistent, provide fast feedback, and remove as much friction as possible.
These are principles we live by here at Spectro Cloud, building Palette for engineers like you, (even though they can sometimes be challenging to reconcile with other goals).
From the start we’ve offered multiple ways to interact with the Palette platform, including the graphical user interface (GUI) you see in most of our demos, but also via Terraform, command-line interface (CLI), and terminal user interface (TUI).
These tools are designed to work together, not compete with each other. No matter which interface you choose, they all communicate with the same Spectro Cloud API. That shared, API-centered approach makes it easy to pick the tool that fits your requirements.
In this blog, we take a closer look at a few example workflows to explore how these tools show up in real, day-to-day operations. Did we achieve our goal of great devex? You decide..
Example 1: Bringing infrastructure as code (IaC) to AWS Kubernetes with Terraform
The Spectro Cloud Terraform provider brings a true Infrastructure as Code (IaC) experience to Kubernetes cluster lifecycle management, covering Day 0, Day 1, and selected Day 2 operations. It allows platform teams to manage clusters using the same Terraform-based workflows they already rely on for the rest of their infrastructure.
Instead of clicking through the GUI or running one-off commands, you take a declarative approach and describe the desired state of your clusters and their configuration in Terraform. When Terraform runs, either manually or as part of a CI/CD pipeline, it compares that desired state with what’s actually running, determines what needs to change, and applies those changes through the Spectro Cloud API.
The result is a workflow that feels familiar to teams already using Terraform: consistent, repeatable, and automation-ready. This declarative model lays a solid foundation for CI/CD-driven cluster management while making changes predictable, auditable, and easy to scale across environments.
Let’s walk through an example of managing an AWS Kubernetes cluster with Terraform. We’ll keep things focused here, but if you want to explore the full setup or additional capabilities later, the Spectro Cloud documentation site has a complete walkthrough.
We’ll need two Terraform files. The first, cluster_profiles.tf, defines the cluster profiles and their versions. The second, clusters.tf, uses those profiles to create the clusters themselves.
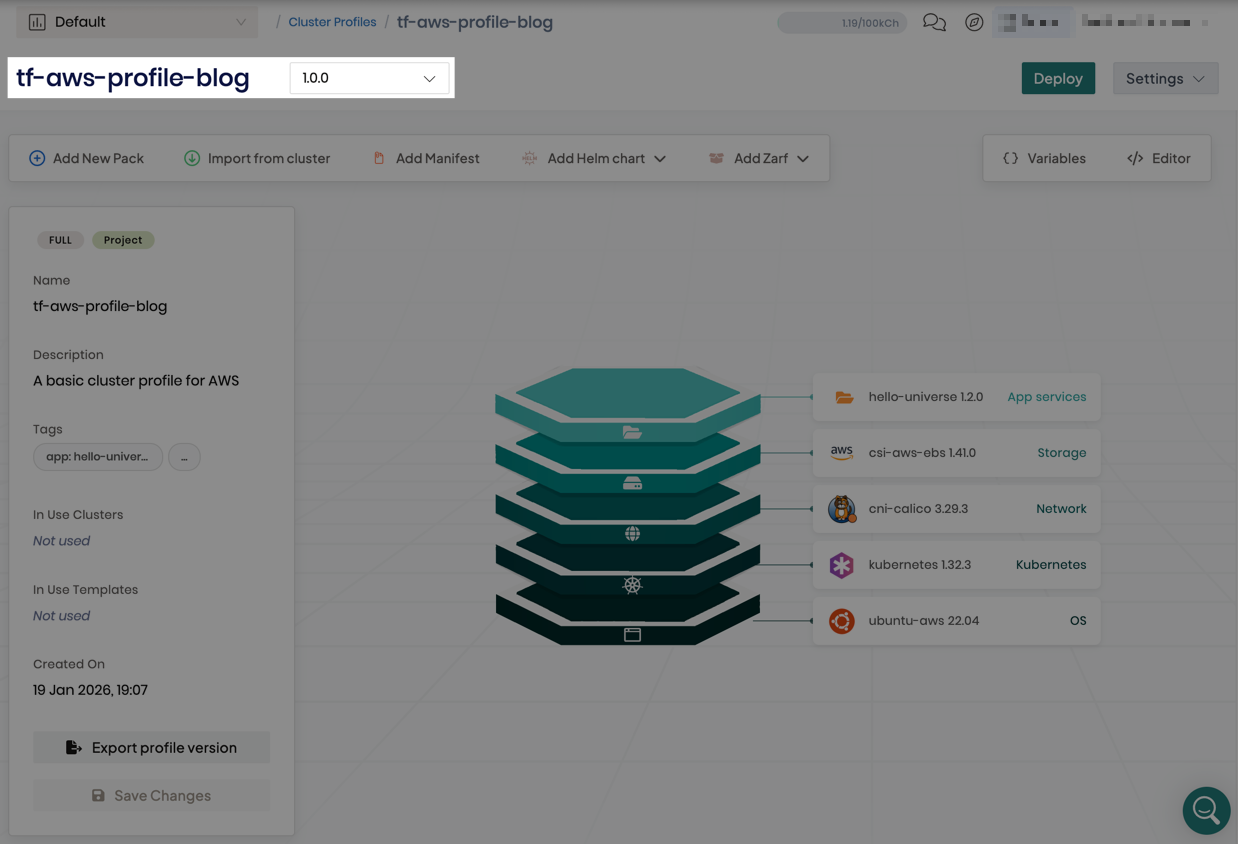
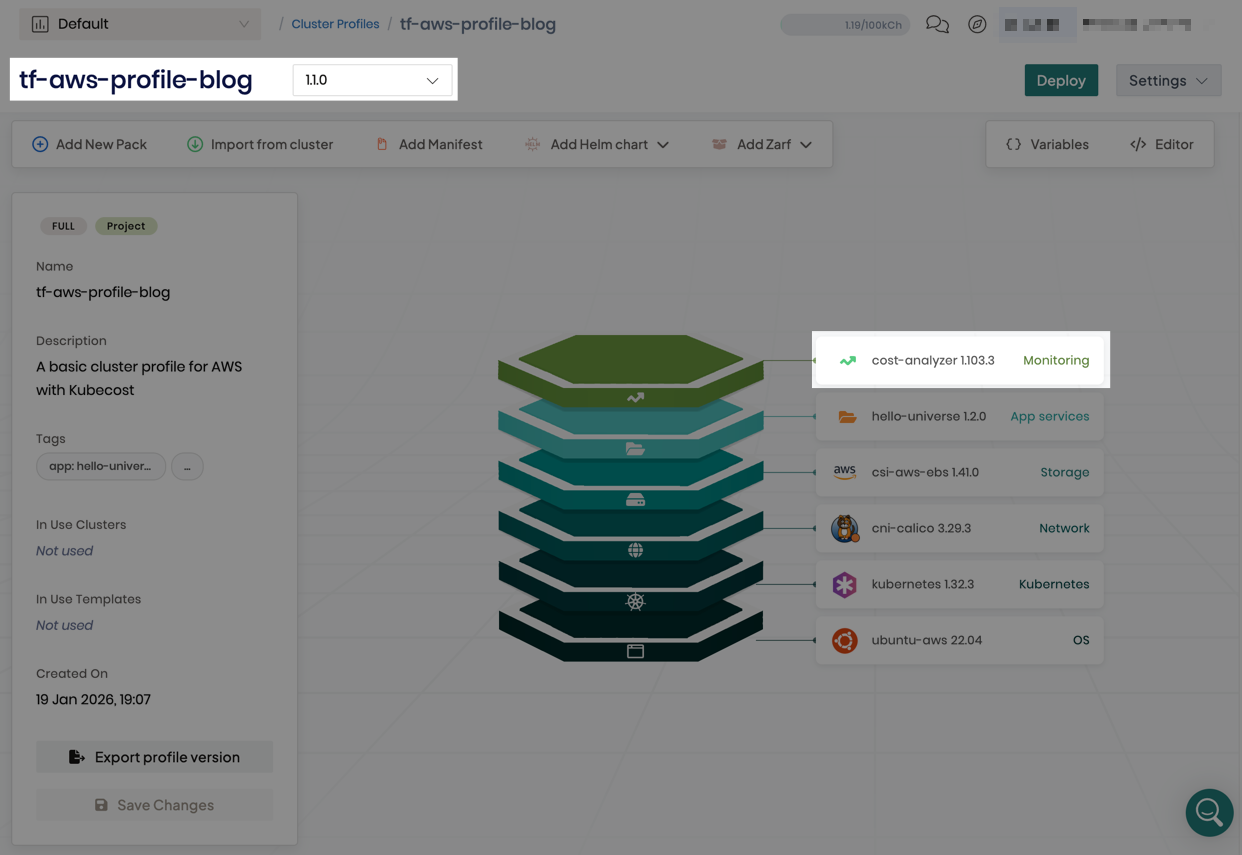
Below is a shortened snippet from cluster_profiles.tf showing two versions of an AWS cluster profile. The second version simply adds the Kubecost pack, which makes it a good illustration of how cluster profiles can evolve without starting from scratch.
...
############################
# AWS Cluster Profile v1.0.0
############################
resource "spectrocloud_cluster_profile" "aws-profile" {
  count = var.deploy-aws ? 1 : 0
  name        = "tf-aws-profile-blog"
  description = "A basic cluster profile for AWS"
  tags        = concat(var.tags, ["env:aws"])
  cloud       = "aws"
  type        = "cluster"
  version     = "1.0.0"
  pack {
    name   = data.spectrocloud_pack.aws_ubuntu.name
    tag    = data.spectrocloud_pack.aws_ubuntu.version
    uid    = data.spectrocloud_pack.aws_ubuntu.id
    values = data.spectrocloud_pack.aws_ubuntu.values
    type   = "spectro"
  }
  pack {
    name   = data.spectrocloud_pack.aws_k8s.name
    ...
  }
  pack {
    name   = data.spectrocloud_pack.aws_cni.name
    ...
  }
  pack {
    name   = data.spectrocloud_pack.aws_csi.name
    ...
  }
  pack {
    name = data.spectrocloud_pack.hellouniverse.name
    ...
    })
    type = "oci"
  }
}
############################
# AWS Cluster Profile v1.1.0
############################
resource "spectrocloud_cluster_profile" "aws-profile-kubecost" {
...
  version     = "1.1.0"
...
  pack {
    name   = data.spectrocloud_pack.kubecost.name
    tag    = data.spectrocloud_pack.kubecost.version
    uid    = data.spectrocloud_pack.kubecost.id
    values = data.spectrocloud_pack.kubecost.values
    type   = "oci"
  }
}
Each pack {} block pulls its details from a Terraform data resource. This avoids hard-coding pack metadata and keeps cluster profiles flexible as pack versions change. This file captures everything that would otherwise be configured manually in the Palette GUI. The profile name, version, description, tags, cloud type, and the set of packs are all defined explicitly in code. By managing cluster profiles this way, teams can move profile creation out of the GUI and into version-controlled Terraform workflows, making cluster configuration consistent, repeatable, and easier to evolve over time.
The clusters.tf file defines the AWS cluster to be deployed by referencing other Terraform resources and input variables. These references are used to assemble the full cluster configuration, including the cluster profile, cloud account, region, and node layout.
Below is a cropped extract from the clusters.tf file defining the AWS cluster. The cluster references the cluster profile resources we’ve already discussed. Terraform will detect this dependency and create the cluster profile resources first, ensuring that the workflow succeeds.
...
#############
# AWS Cluster
#############
resource "spectrocloud_cluster_aws" "aws-cluster" {
  count = var.deploy-aws ? 1 : 0
  name             = "aws-cluster"
  tags             = concat(var.tags, ["env:aws"])
  cloud_account_id = data.spectrocloud_cloudaccount_aws.account[0].id
  cloud_config {
    region       = var.aws-region
    ssh_key_name = var.aws-key-pair-name
  }
  cluster_profile {
    id = var.deploy-aws && var.deploy-aws-kubecost ? resource.spectrocloud_cluster_profile.aws-profile-kubecost[0].id : resource.spectrocloud_cluster_profile.aws-profile[0].id
  }
  machine_pool {
    control_plane           = true
    ...
  }
  machine_pool {
    name          = "worker-pool"
    ...
  }
  timeouts {
    create = "45m"
    delete = "45m"
  }
}
...
You can apply the configuration using the following command.
terraform apply -auto-approve
After the deployment completes, the cluster profile defined in cluster_profiles.tf appears in Palette with the name specified in the spectrocloud_cluster_profile resource. The profile includes two versions: version 1.0.0, which contains the configuration without Kubecost, and version 1.1.0, which extends the profile by adding the Kubecost pack.
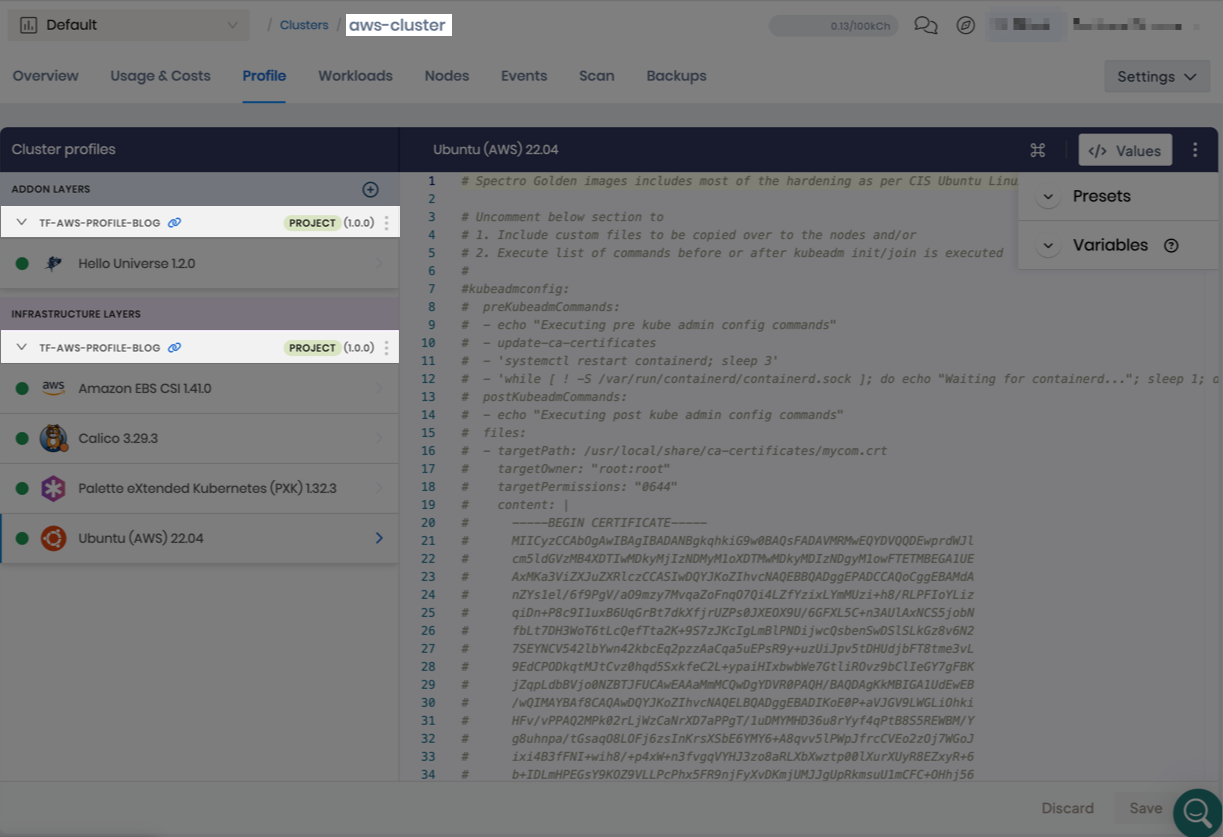
A new cluster based on the 1.0.0 cluster profile version also appears in Palette. The cluster name matches the value specified in the name parameter of the spectrocloud_cluster_aws resource in the clusters.tf file.
You can use Terraform to seamlessly update a cluster to a newer profile version, such as version 1.1.0. This makes Day 2 changes predictable, auditable, and easy to automate.
This is how you can manage cluster profiles and clusters declaratively, without configuring them through the GUI. To explore this further, check out the Spectro Cloud Terraform provider documentation and the blog post How to fill the Terraform Day 2 operations gap.
Example 2: Streamlining Kubernetes operations with the Palette CLI
Sometimes the fastest way to get things done is directly from the terminal. That’s exactly what the Palette CLI is designed for: a simple, focused command-line experience that keeps common workflows quick, clear, and easy to run.
The Palette CLI is particularly well-suited for scenarios where hands-on control matters, such as deploying local Edge clusters, installing self-hosted Palette or VerteX on VMware, and deploying Palette Private Cloud Gateways (PCGs).
Let’s take a look at how you can use the Palette CLI to deploy a VMware PCG. A PCG acts as a secure connectivity layer between Palette and your target infrastructure, enabling cluster lifecycle management.
Start by installing Palette CLI using the official installation guide. Once the CLI is set up and authenticated with Palette, you can begin the PCG deployment by executing the following command.
palette pcg install
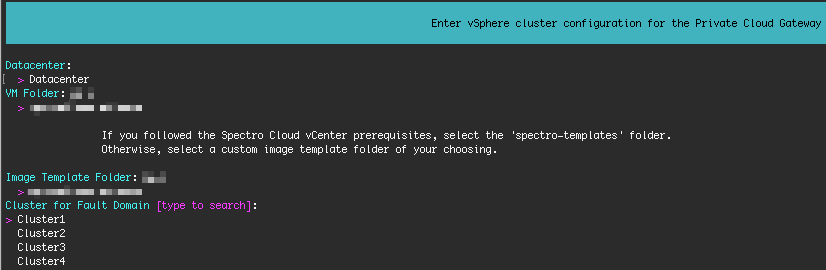
The CLI walks you through the required configuration interactively, prompting for details such as your vSphere account, PCG cluster settings, networking, and security options, including the encryption passphrase used to protect sensitive configuration data. For a complete list of fields, refer to the Deploy a PCG with Palette CLI tutorial.
During this process, Palette CLI validates your input and surfaces errors immediately if values are missing or invalid.

It also uses the VMware credentials you provide to query your vSphere environment and present valid configuration options to choose from, helping prevent impossible or non-existent values and reducing configuration errors.
Once you provide all the required information, the PCG deployment starts automatically. You can monitor its progress in both the terminal and the Palette GUI.
Once the deployment completes, the terminal reports a successful installation, and the PCG appears as Healthy in the Palette GUI.
While the CLI supports an interactive, guided flow, you can also generate and reuse a configuration file that contains all required values. This feature makes CLI runs repeatable and easier to integrate into scripted or automated workflows, without requiring full infrastructure-as-code setup.
As you’ve just learned, the Palette CLI gives you a fast, direct way to work with the Spectro Cloud API from the terminal. It sits nicely alongside Terraform and the GUI, making it easy to handle common operational tasks without writing infrastructure code or clicking through screens. When you use it interactively, it walks you through the configuration step by step, so you always know what’s happening.
To learn more about Palette CLI and the available commands, check out the official Spectro Cloud Palette CLI documentation.
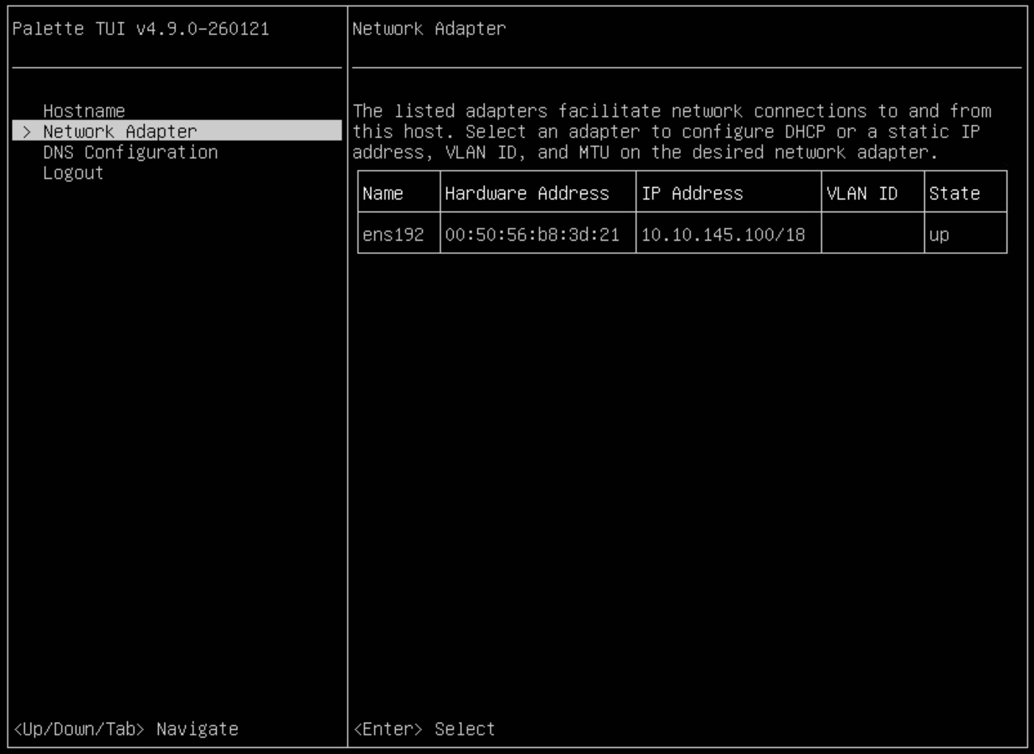
Example 3: Bootstrapping edge hosts with the Palette TUI
But what if you’ve just deployed an edge host and need to perform the initial setup? At this stage, it’s too early for automation, and even the CLI may not be practical yet, since basic networking and system settings still need to be configured.
That’s where the Palette TUI comes in. The TUI provides a lightweight, interactive way to configure an edge host directly from the terminal before it joins a cluster. Because it runs on the host console, it works even when networking is only partially configured or not yet available, making it ideal for hands-on host setup.
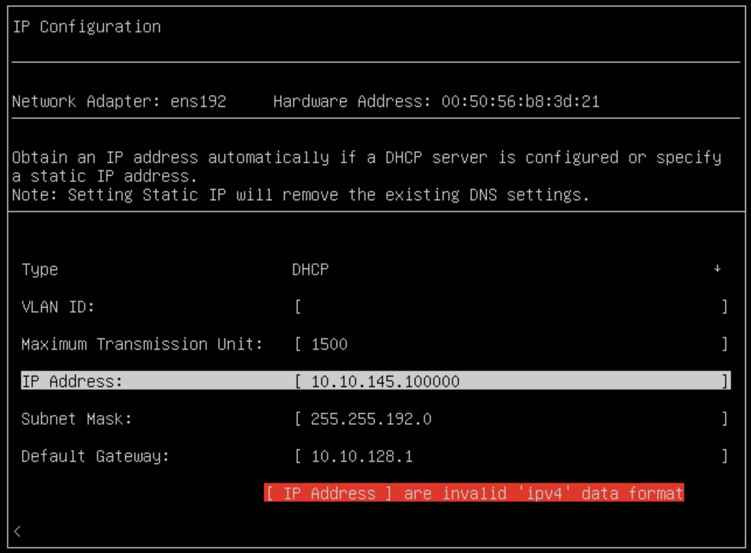
Using the TUI, you can review and update the hostname, configure network adapters, and manage DNS settings.
Network configuration includes choosing between DHCP and static IP addressing, specifying subnet masks and default gateways, setting VLAN IDs for traffic segmentation, and adjusting MTU values. DNS configuration allows you to define primary and secondary name servers, as well as an optional search domain.
The TUI also includes built-in validation, providing immediate feedback when invalid values are entered, such as incorrectly formatted IP addresses or unsupported MTU values. This helps catch configuration issues early, before the host is used for cluster creation.
Overall, the Palette TUI fits naturally into edge workflows where minimal tooling, low resource usage, and local access matter. It complements the CLI and Terraform by focusing on host-level initialization, keeping early setup interactive and error-resistant, without requiring any web UI components.
For more information on the Palette TUI, refer to the official Initial Edge Host Configuration with Palette TUI guide.
One platform, multiple ways to work
In these examples, we’ve explored how different Spectro Cloud tools show up at different moments in the Kubernetes lifecycle. Terraform is there when you want structure, repeatability, full customization and automation. The Palette CLI shines when you just want to get things done quickly from the terminal, following core workflows. And the Palette TUI steps in at the very beginning, when you’re setting up an edge host, and a local, guided experience is exactly what you need.
Together, these tools give you options. You’re not forced into a single interface or workflow, and you don’t have to bend your process around the GUI. Instead, API-driven, automation-friendly, and consistent workflows form the foundation of a strong developer experience — exactly what our cloud-native and platform engineering communities advocate for.
As platforms and workflows evolve, so do expectations around the developer experience. At Spectro Cloud we’re continuing to invest across all interfaces to make Kubernetes platform work smarter, faster, and more enjoyable.