


What is a Kubernetes ingress?
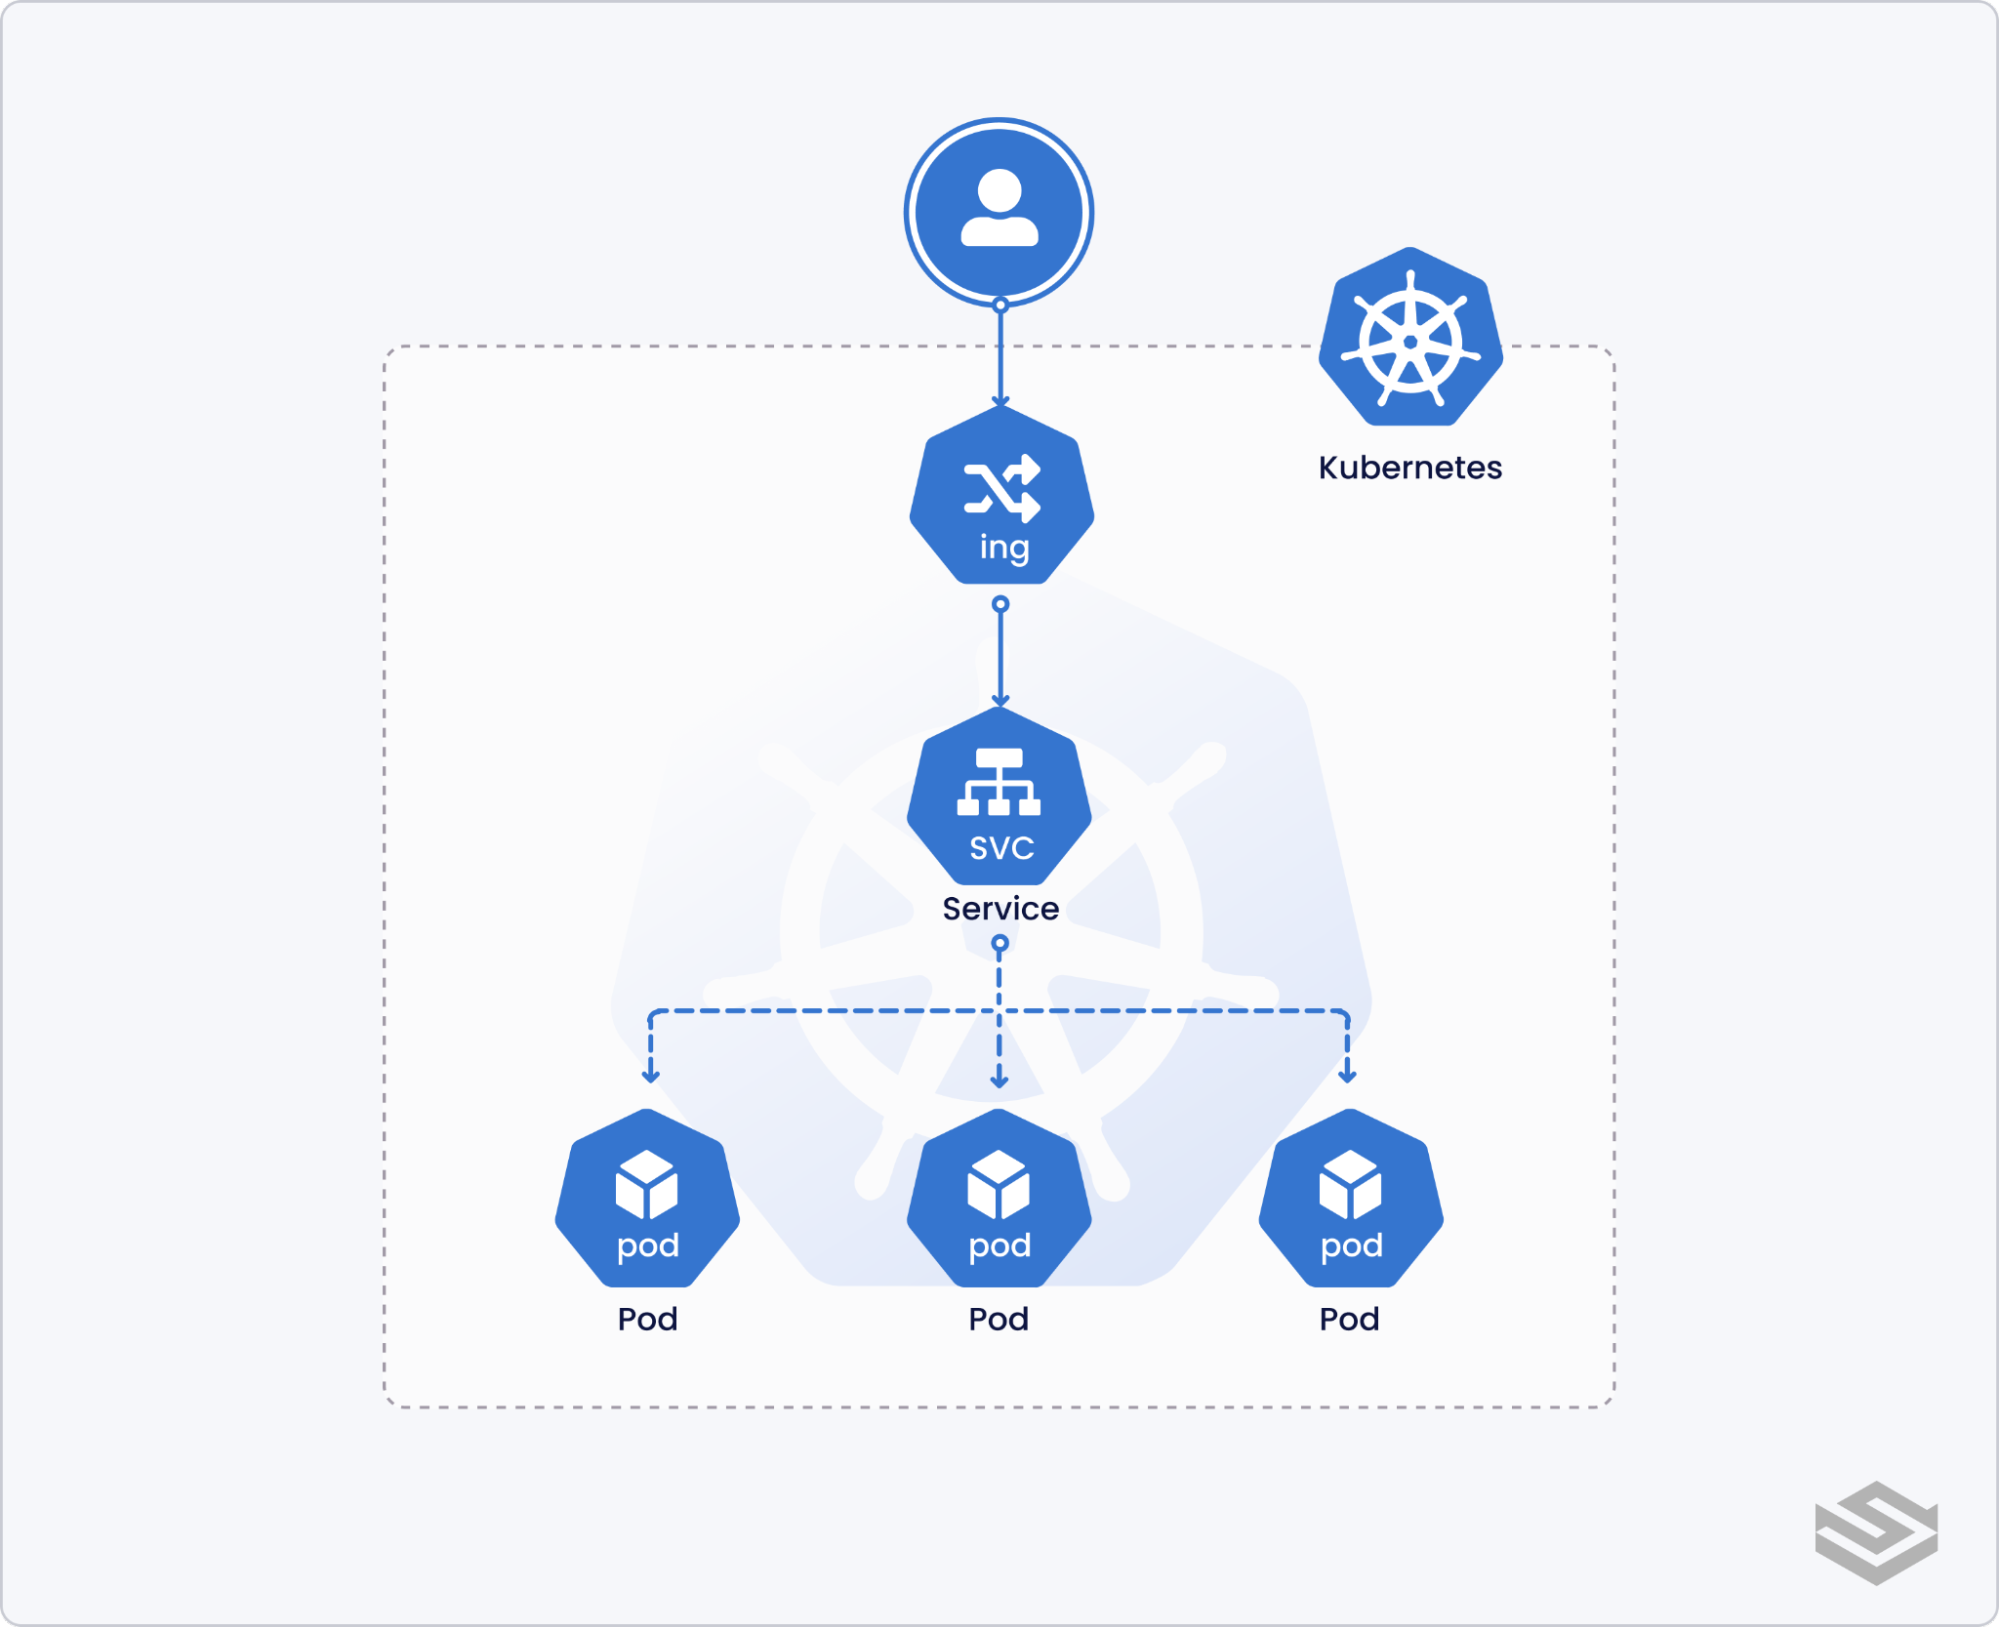
A Kubernetes ingress is an API object that handles access to Kubernetes services from sources external to the cluster. Traffic into the cluster is then managed by the rules defined by the ingress to route to different applications inside Kubernetes.
Using an ingress gives a Kubernetes administrator a single place to govern external access to multiple services running on the cluster. Ingress resources allows for a consistent set of routing rules, independent of the configuration of individual node services. This makes ingress vital for organizations scaling their use of Kubernetes.
In Getting started with Kubernetes Services, we learned about the different Service types (e.g., ClusterIP, NodePort, and LoadBalancer) and how they enable communication between pods and external services. In this blog, we'll discuss the differences between Kubernetes Ingress and service types that can also expose services outside the cluster. Then we’ll briefly overview some popular Ingress controllers and finish with an example of setting up a HTTPS Ingress with nginx.
Ingress vs NodePort/LoadBalancer
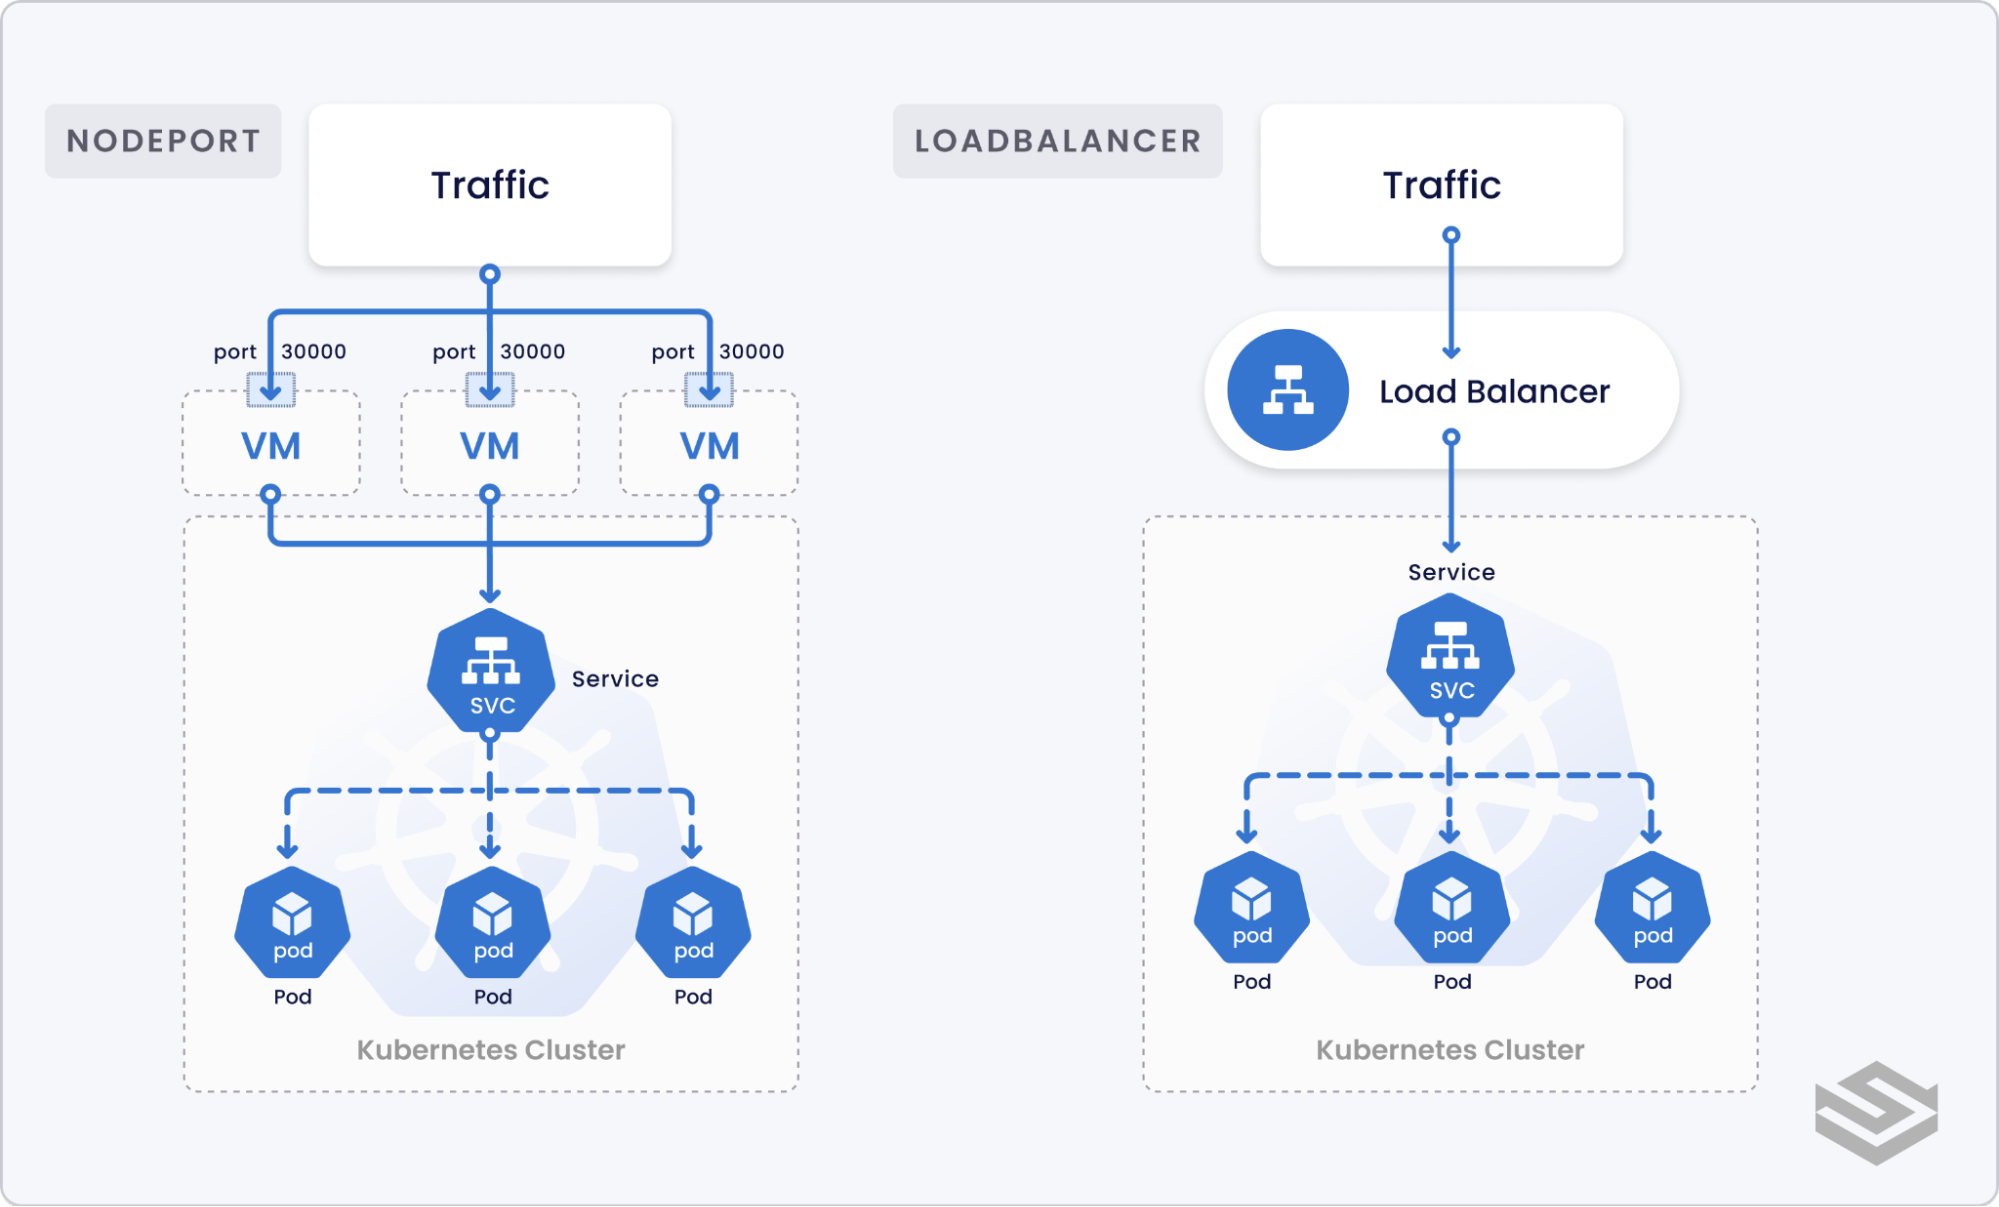
To quickly recap, Kubernetes provides two ways to expose a service to external traffic:
- NodePort: NodePort exposes a static port on all the nodes in the Kubernetes cluster. Any traffic request to the specified port is then forwarded to one or more nodes that may serve the pods related to the service.
- LoadBalancer: An external load balancer (e.g., AWS Elastic Load Balancer, Google Cloud Load Balancer, Azure Load Balancer, MetalLB) is provisioned to load balance and route external requests to Kubernetes internal services.
While both NodePort and LoadBalancer service types allow external traffic into the cluster, their functionalities are quite limited in scope.
Whenever you create a new service you must create a new NodePort or a LoadBalancer. In the case of LoadBalancer, this could incur more cost based on the supported load balancer provider. Also, there is no functionality to support networking logic such as domain-based routing or TLS termination.
Ingress, on the other hand, creates a single resource to consolidate services requiring exposure to external traffic as well as unifying routing logic.
For example, if we have two microservices servicing two different endpoints, ingress can route requests to one service versus another based on the domain, path, or HTTP header content.
Ingress can also handle common network operations such as HTTPS redirection, TLS termination, or rate-limiting based on IP. Thus, ingress allows application developers to offload such complex logic to the Ingress and focus on core feature functionality on the services.
To use an Ingress, Kubernetes requires an ingress controller to handle ingress API requests.
Some managed Kubernetes offerings come with an existing ingress controller (e.g., GCE Ingress Controller on Google Kubernetes Engine). However, for most self-hosted options, you need to first install and configure an ingress controller before using an Ingress.
Overview of ingress controllers
Kubernetes officially supports GLBC (GCE L7 Load Balancer) and ingress-nginx controllers, but there are popular alternative options.
First, we have cloud-specific ingress controllers.
- On Azure, we have the Azure Application Gateway Kubernetes Ingress to work with Azure Kubernetes Service (AKS).
- On AWS there is the AWS Load Balancer Controller to create Classic, Network, or Application Load Balancers.
- GKE comes with GLBC preinstalled.
Next, we have ingress controllers based on the popular open-source Nginx reverse proxy.
- First there’s the ‘official’ ingress controller from NGINX Inc (now owned by F5)
- There’s the open-source ingress-nginx controller maintained by the Kubernetes community.
- Lastly there is Kong Ingress Controller for those looking for a Kubernetes-native API Gateway solution.
Another popular category of Ingress Controller are built on top of Envoy:
- Istio Ingress: official ingress controller for clusters using Istio service-mesh
- Emissary: Kubernetes Ingress with API Gateway and Layer 7 load balancing capabilities from the Ambassador team
- Contour: A Cloud Native Computing Foundation Incubating project for high-performance ingress needs
- Gloo: Kubernetes Ingress with API Gateway features from solo.io
And that’s not all… there’s also:
- HAProxy: Ingress built on top of HAProxy load balancer
- Voyager: Another Ingress using HAProxy underneath
- Traefik: HTTP reverse proxy and load balancer that works with containerized services including Kubernetes, Docker, and Consul
With such a huge range of options, it can be daunting to choose an ingress controller. As a general rule, ingress-nginx is a safe choice given that it is actively maintained by the Kubernetes community with plenty of documentation. If your solution is fully on the cloud, then using a cloud-specific ingress controller may be the simplest option. Finally, if you are already using Istio as your service-mesh layer, you can use Istio Ingress or consider other Envoy-based solutions.
How to set up Nginx ingress
Since ingress-nginx is the ingress controller officially supported by the Kubernetes community, we will use that for this example. To follow this guide, you will need a Kubernetes cluster. Ingress-nginx documentation lists all the supported Kubernetes distributions if you want to follow along.
You have a few options to install the Nginx ingress controller into the cluster:
- Using the ingress-nginx Helm chart
- Applying Kubernetes YAML manifests directly via kubectl apply
- Utilizing built-in addons (e.g., for minikube or MicroK8s)
For this guide, we will use Helm to install. The guide assumes installing the controller to the
ingress-nginxnamespace, but feel free to update as necessary:
  $ helm repo add ingress-nginx https://kubernetes.github.io/ingress-nginx
$ helm repo update

$ helm upgrade --install ingress-nginx ingress-nginx \
  --repo https://kubernetes.github.io/ingress-nginx \
  --namespace ingress-nginx --create-namespace
The Helm chart will deploy the ingress-nginx controller and also provision a LoadBalancer based on the Kubernetes distribution of choice (e.g., AWS ELB for EKS). The chart also comes with a lot of nice integrations with useful tools such as Prometheus and DNS services.
Wait for all the pods in the
ingress-nginxnamespace to be healthy and for the load balancer to be provisioned:
$ kubectl get pods -n ingress-nginxThere are a few things you should note with this installation:
- The current version of ingress-nginx uses the stable
networking.k8s.io/v1API for managing Ingress objects. If you are running Kubernetes clusters older than v1.22, you may be using deprecated versions of the Ingress API (extensions/v1beta, networking.k8s.io/v1beta1) that would be rejected.
- Nginx expects the ingressClassName field to exist. This will take precedence over kubernetes.io/ingress.class annotation that you may see in guides for older versions.
Creating an ingress object
Now that the ingress controller is up and running, we can create some Ingress objects to demonstrate that our ingress is working as expected.
Kubernetes ingress example
First, let’s create two services to demonstrate how the ingress routes our request. We’ll run two web applications that output a slightly different response.
Let’s assume that two Kubernetes services already exist: service-a and service-b, both exposing port 80. If we want domain-based routing, where a.example.com maps to service-a and b.example.com maps to service-b, we can create the following Kubernetes manifest.
 apiVersion: networking.k8s.io/v1
kind: Ingress
metadata:
  name: ingress-service-a
spec:
  ingressClassName: nginx
  rules:
    - host: a.example.com
      http:
        paths:
          - path: /
            backend:
              serviceName: service-a
              servicePort: 80
---
apiVersion: networking.k8s.io/v1
kind: Ingress
metadata:
  name: ingress-service-b
spec:
  ingressClassName: nginx
  rules:
    - host: b.example.com
      http:
        paths:
          - path: /
            backend:
              serviceName: service-b
              servicePort: 80
Create the object via kubectl apply and we can see traffic being routed accordingly.
To add TLS termination, we need to first create a TLS cert. You can either create a self-signed TLS certificate following the NGINX guide, or get a CA_signed certificate from a provider such as letsencrypt, Venafi, or DigiCert. Once you have your certificate, create a Kubernetes secret with the contents.
$ kubectl create secret tls tls-secret –key tls.key –cert tls.crtThen create an ingress object with the following contents:
apiVersion: networking.k8s.io/v1
kind: Ingress
metadata:
  name: tls-example
spec:
  tls:
    - hosts:
        - tls.example.com
      secretName: tls-secret
  ingressClassName: nginx
  rules:
    - host: tls.example.com
      http:
        paths:
          - path: /
            pathType: Prefix
            backend:
              service:
                name: service-a
                port:
                  number: 80
Now when you hit https://tls.example.com, it will terminate the TLS connection and route to service-a on port 80.
Next steps
So there you have it: a working ingress running on your Kubernetes cluster. But that’s just the start. The Nginx ingress controller comes with a robust set of configuration options including sticky sessions, authentication, gRPC, and more. Peruse its documentation website and play around with the different annotations. Also, be sure to check out other popular ingress controllers as they integrate better with service meshes or have better support for non-HTTP protocols. For more resources on Kubernetes ingress controllers, check out “Comparison of Kubernetes Ingress controllers”.
Finally, don’t forget that you can use our Palette Kubernetes management platform to design and build a cluster profile blueprinting all the elements of a complete cluster — including ingress. From our GUI or CLI you can select a pre-validated and pre-tested integration with Nginx, Kong, or Gloo. You can sign up for a free Palette account, with no credit card needed, to test this out.