
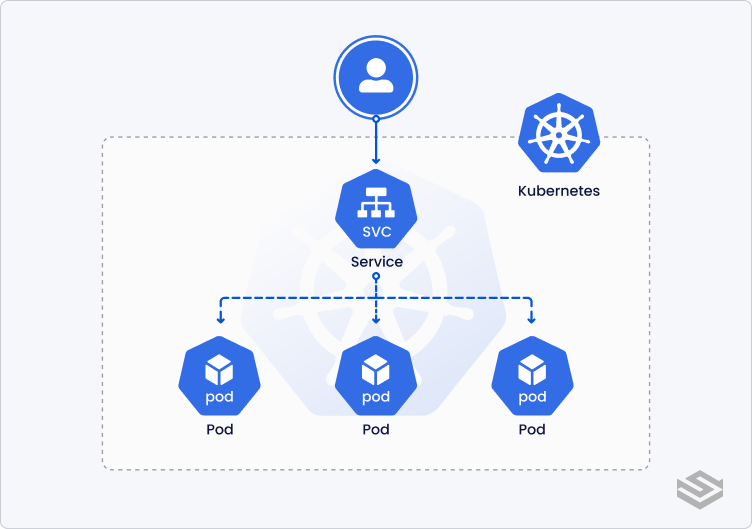
Kubernetes Service is an abstraction that allows pods to be created or destroyed without the underlying client needing to keep track of it, helping resolve complex problems like service discovery.
Choosing the right service type is critical to designing your architecture correctly and saving time during the debugging phase. Getting familiar with the different types of services in Kubernetes is an integral part of mastering Kubernetes and enables the communication between pods, users, and external services. In this blog, we’ll look at how Kubernetes provides different service types and how to expose these services outside the cluster as type LoadBalancer or NodePort.
What is a Kubernetes Service?
A Kubernetes service is a mechanism of grouping pods running on the cluster. Since pods are ephemeral, meaning they’re created and destroyed on a regular basis, we use Kubernetes services to keep track of changes on the pod. Services provide functionality like load balancing, service discovery between apps, and support for zero-downtime app deployments.
So what is a service in Kubernetes? Kubernetes services expose a single endpoint for your application in the form of virtual IP. All the requests made to your service get redirected to appropriate pods, and thus service becomes a single endpoint for application communication.
Meet the three Kubernetes Service types
Kubernetes offers three different service types :
- ClusterIP: A ClusterIP creates a service inside the Kubernetes on a cluster-internal IP.. ClusterIP is the default service type i.e. when you create a service and don't define the service type, it will automatically create a ClusterIP service.
- NodePort: The NodePort service, like ClusterIP, is assigned an IP address, but it also exposes the application on a port shared by all nodes in the cluster. Any request for the particular port has been redirected and forwarded to one or more specified nodes.
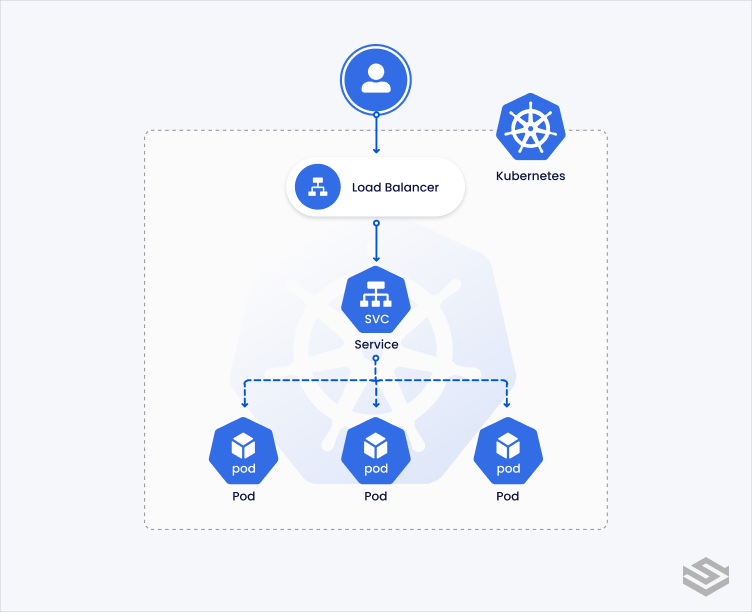
- LoadBalancer: The LoadBalancer service is implemented on top of the NodePort and ClusterIP service and exposes services over the internet for external access. Any request to the IP of the loadbalancer forwards to the appropriate node in the cluster. Hosting your Kubernetes cluster on a supported cloud provider, such as AWS, Google Cloud, Azure or Tencent allows you to leverage the Kubernetes loadbalancer.
In brief: how Kubernetes Services work
Kubernetes runs a “node agent” called kubelet that is primarily responsible for creating and managing pods. Each kubelet process on each node watches the changes in the cluster through the kube-apiserver. With every request for pod creation, kubelet comes into play and takes care of it. Kubelet then invokes the Container Network Interface (CNI) plugin to configure networking for that pod.
All the nodes in the cluster have a kube-proxy service that monitors changes in the cluster via the kube-api server. Every time a new service needs to be created, kube-proxy steps in. When creating a service object, it gets an IP address from a predefined range (specified on the kube-api server under service-cluster-ip-range).
The kube-proxy server running on each node gets that IP address and creates forwarding rules, using iptables, as default, but IPVS is also an option. The rule will be similar to: all the requests coming to this Service IP to be forwarded to the Pod IP.
In the rest of this blog, we’ll look at how you can use the three service types, step by step.
Creating a NodePort Service
To create any Kubernetes resource, you need to define the object in the YAML file. Like any other resource definition, the service starts with four mandatory fields:
- apiVersion: Used to define which version of Kubernetes API you are using to create the object. Make sure that you are using the appropriate apiVersion based on the resource you are creating. The apiVersion for pod is v1. Check the following guide to find more information.
- kind: Refers to the kind of object that you are trying to set up, in this case, service. Other possible values are POD, ReplicaSet, Deployment, etc.
- metadata: Data about the object that helps to uniquely identify it. This could be as simple as a name or a label.
- spec: Defines the desired state of the object, which varies from object to object as it contains nested fields specific to the object that you are creating. For example, it is in the spec field that you define the ports for your service. Further information can be found in the following guide.
Kubernetes provides a service-discovery mechanism natively, which means that you don’t need to modify your application to use an external service-discovery mechanism. Kubernetes provides Pods with IP addresses and a single DNS name for a set of Pods, providing a load-balance capability. To take full advantage of these Kubernetes features the spec field of the service object needs to be set up correctly, so let's dig deeper into the spec.
- type: Specifies the service: ClusterIP, NodePort, or LoadBalancer.
- selector: To connect the service to a pod you need to use the selector field. For example, a service with a selector label run:nginx will be attached to any Pod with the run:nginx label.
- Ports: As shown in Figure 1, three ports are involved in the service creation process.
TargetPort: The target port is the port where your pod is listening, and the service will send the request (targetPort: 80).
Port: Port exposes the Kubernetes service on the specified port in the cluster. Pods within the cluster can use this port to communicate with each port (port: 80).
NodePort: NodePort exposes the service externally to the cluster (NodePort 30008). NodePort can only be between 30000 and 32767
The only mandatory field in the spec is the Port. The TargetPort is assumed to be the same as the Port. If you don't provide the NodePort, a free port in the valid range between 30000–32767 is automatically allocated.
Remember that ports are always an array. You can have multiple such port mappings within a single service

By combining everything, you can now create a YAML file. Your YAML file can have any name but should end with a .yaml extension (for example, myservice.yaml)
To create a service use the kubectl create command and specify the file name (myservice.yaml) created in the above step.
To verify that the service is set up correctly, run
You should see that the service TYPE is NodePort.
Use the command
with the service name to retrieve detailed information.
Run the command
followed by the Node IP and port number we specified at NodePort, to access the service.
Creating a ClusterIP Service
Creating a ClusterIP service is similar to NodePort, the only difference is the
is ClusterIP. By default, when creating a service, if you omit this field, Kubernetes will create the service of type
Use the kubectl create command, specifying the file name, myservice1.yaml, prepared in the previous step as the argument, to create the service.
Verify the service was successfully formed by using the command:
As you can see the TYPE is ClusterIP.
This service can be accessed by other pods in the cluster using ClusterIP (10.43.126.215) or service name (my-clusterip-service).
Creating a LoadBalancer Service
Creating a LoadBalancer service is similar to other services, the only difference is the type is LoadBalancer and your cloud provider must support it. Following is the list of CloudProviders which support loadbalancer service.
Create the service by using the command:
And specify the file name generated in the above step.
Verify that the service was successfully created by using the command:
As you can see the service TYPE is LoadBalancer. Also, under the EXTERNAL-IP field, you will see а loadbalancer is created, which can be accessed using url
Next steps
Want to read more about Kubernetes services and how to use them? There’s plenty out there, starting with the official Kubernetes docs, and how Google defines the concept in its GKE docs. As always, get in touch if you have any questions — we love engaging on technical topics at developers@spectrocloud.com.