
The most popular networking plugin for Kubernetes
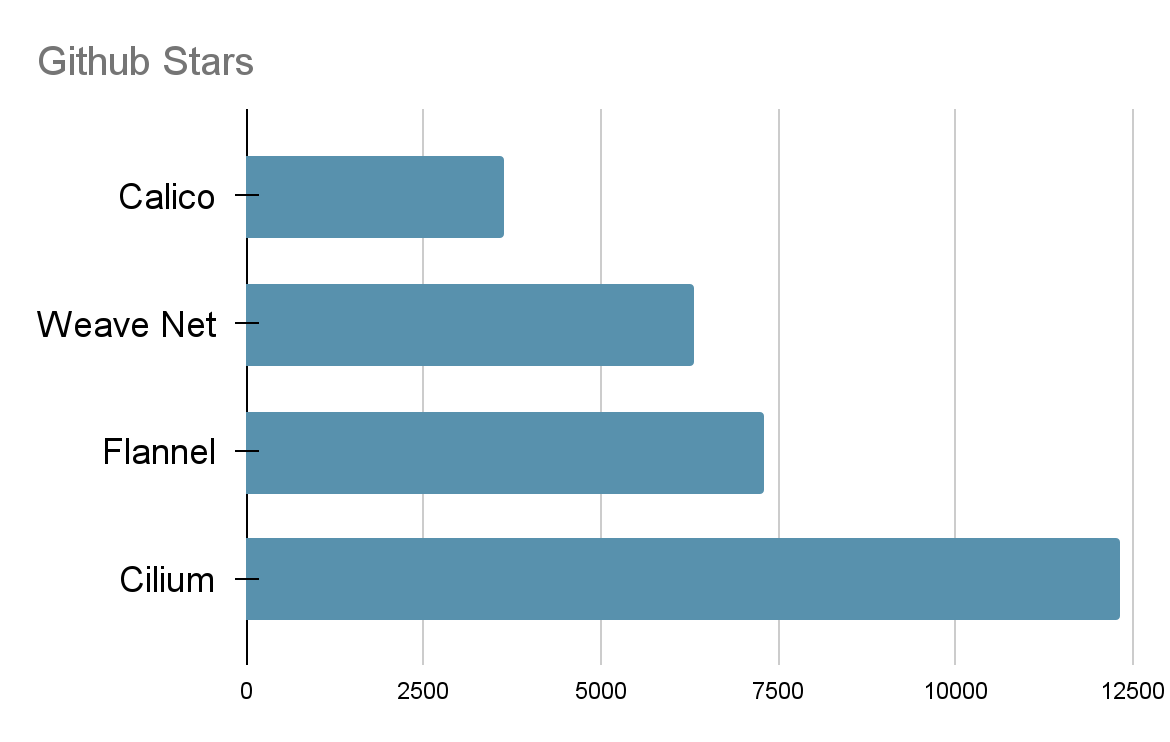
Cilium is an extremely popular open-source Kubernetes network plugin. Just to give you an idea of how popular Cilium is, have a look at the diagram below, to see the amount of Github stars it has compared to other popular network plugins. Cilium is now also a CNCF Incubating project.
Cilium provides networking, security, and observability for cloud-native environments like Kubernetes and other orchestration platforms, but can also provide a communication link to external workloads (such as VMs) into your Kubernetes cluster and enforce security policies to restrict access (currently in beta). Another new (beta) feature is Cilium Cluster Mesh, which allows you to connect Kubernetes clusters together and enable pod-to-pod connectivity, plus the ability to define global services which are load balanced between clusters and enforce security policies to restrict access.

eBPF: the secret ingredient behind Cilium’s success
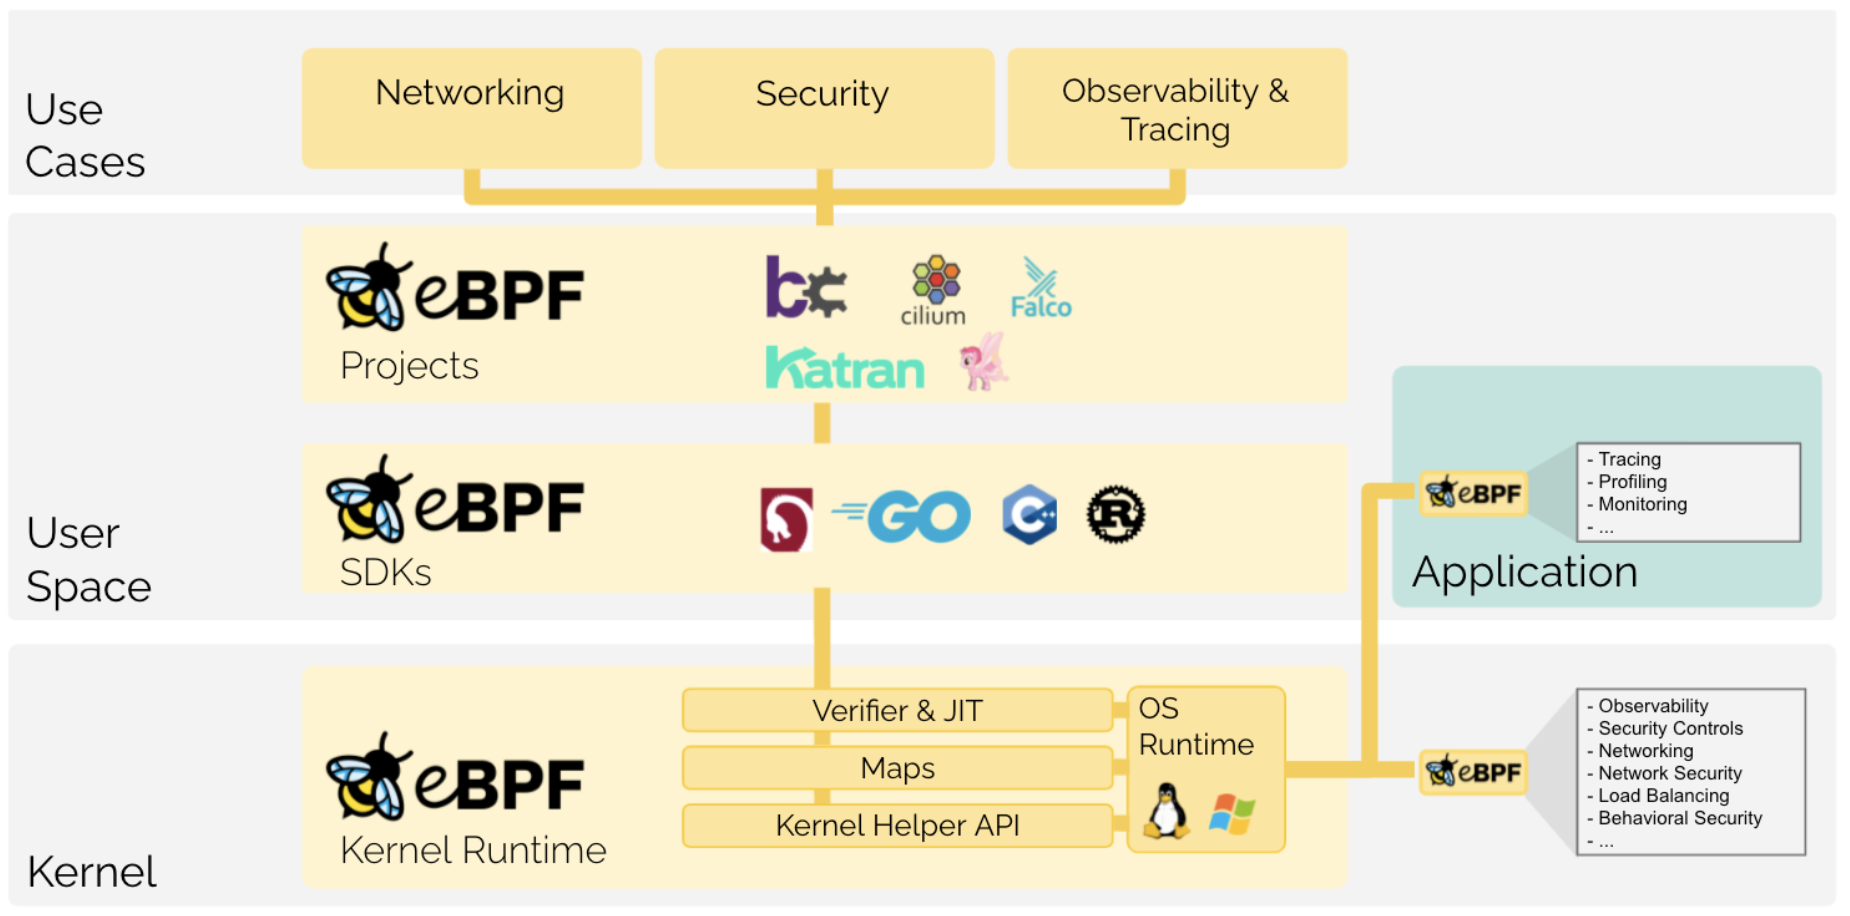
At the heart of Cilium’s powerful feature set is a technology called eBPF. What is eBPF and why are we hearing more and more about this magical tech? To find out, we have to first talk about BPF.
The Berkeley Packet Filter or BPF for short (and no, I did not forget an ‘e’), has been around for a few years now and is a tool for observing the Linux operating system. BPF gives users access to the kernel, by running a small piece of code quickly and safely inside the operating system.
While BPF was originally used for packet filtering, it has since been enhanced to support dynamic tracing of the Linux kernel. Now a user can, for example, create a cgroup-related program that denies or allows access to system resources like CPU, memory, network bandwidth and other groups of processes.
Now extended BPF (eBPF), is a modernized extension of BPF, with 64 bit registers and a bunch of new special functions to interact with the kernel, to request more information and execute a wider range of tasks. Just like Docker made Linux containers cool, Isovalent (creators of Cilium) and other vendors are making eBPF the next big thing in Kubernetes tools and technologies.
Thanks to eBPF, Cilium has a very simple architecture.
Cilium runs one ‘cilium’ agent on every node in the cluster, as a DaemonSet and a ‘cilium-operator’ deployment with one replica. That’s about it.
These resources provide networking, security and observability to the workloads running on the nodes. These workloads don’t even have to be containerized, but could just be natively running on the node.

Now that you know what makes Cilium special, let’s dive right into using it!
I’ll show you how to set up Cilium on K3s (a lightweight Kubernetes distribution) in a second, but there are a few things you might need to configure first to get the most out of Cilium.
First, check your Linux kernel version
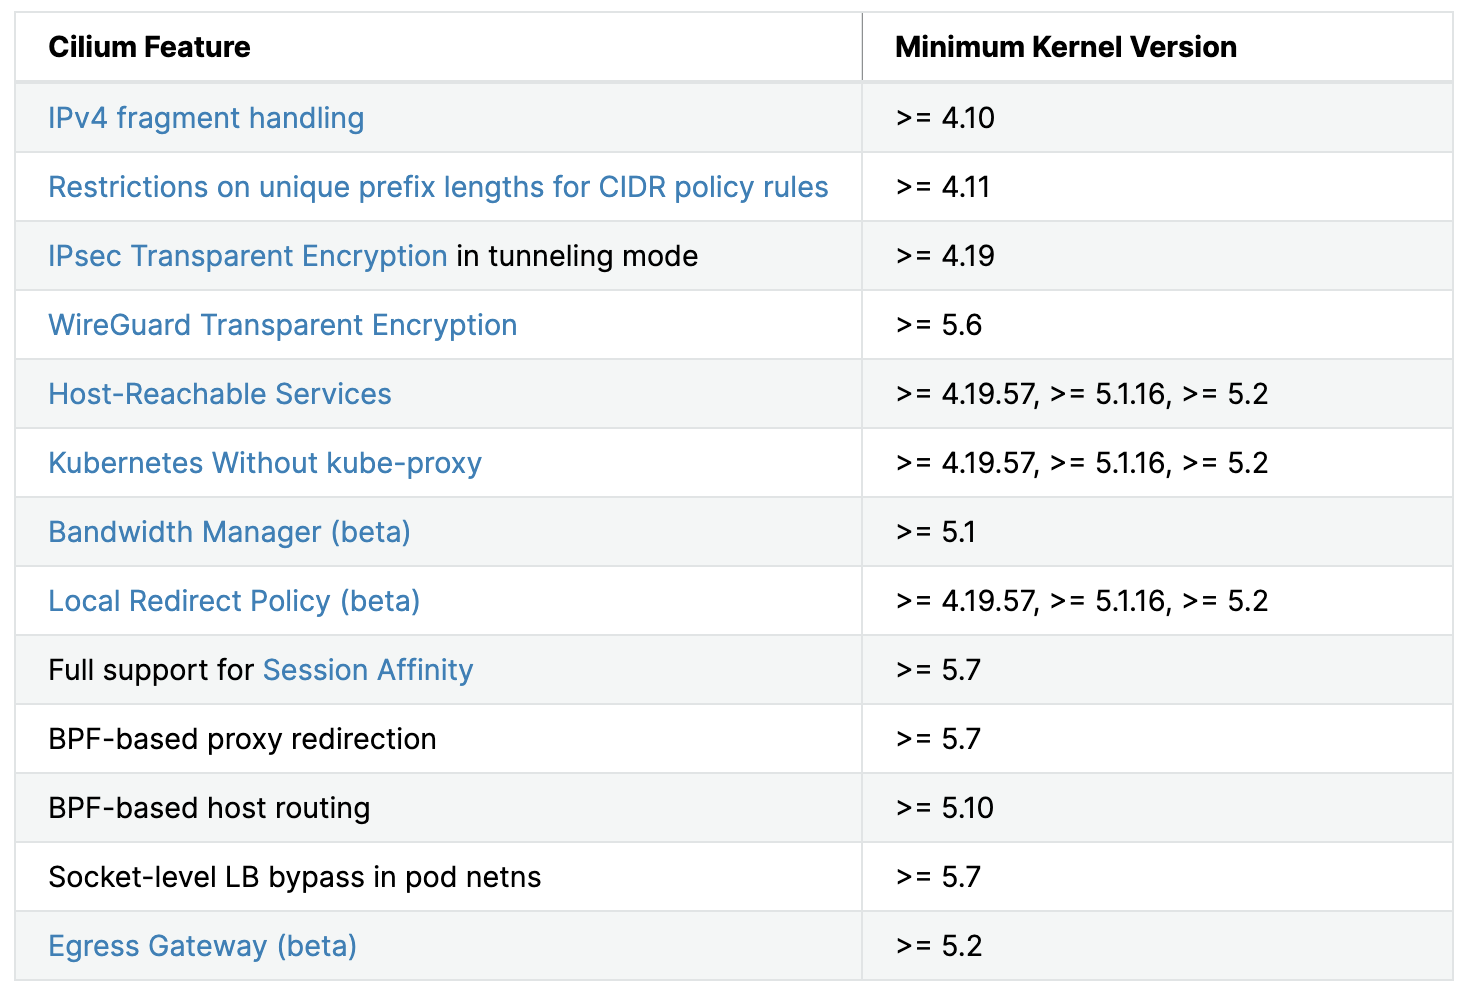
eBPF can be described as a fast-moving target, because developers around the world are working hard on making constant improvements to the Linux kernel and eBPF. For that reason I would recommend updating your Linux kernel, to get all of the new features. The minimum kernel you need is 4.9.17, but here is a list of features that are available starting from specific kernel versions.
For more advanced deployment options, I would definitely recommend going through the corresponding requirements. However, in most cases you’ll be using the Cilium container image ‘cilium/cilium’, deployed in a new or existing Kubernetes cluster with its own etcd, so most dependencies will be managed by the container and orchestrator.
You can check your Linux version by running uname -sr, if you see something like Linux 5.18.8-051808-generic, then you are on kernel version 5.18.8. You probably won’t be though, because most distros aren’t using the latest kernel version. They choose a stable version and build on top of that. Let’s say you run Ubuntu 20.04.4 LTS, then your kernel version will most likely be Linux 5.13.0-51-generic and that’s perfectly suitable for running all the latest features that Cilium has to offer. Upgrading your kernel will depend on your Linux distro and if you’re brave enough to do so. In all fairness, it really isn’t that hard and you can basically always roll back, but I don’t want anyone blaming me for their failed kernel upgrade!
Spin up your VMs and install K3s
For my test environment I’ll be using the following setup:
- 3 VMs with Ubuntu Server 18.04.6 LTS, with the kernel upgraded to 5.18.8
- K3s running as a single server, with two agents
To follow along, spin up three VMs (or use bare metal of course). Then we need to create the /etc/rancher/k3s/ folder and add the config.yaml file and populate its contents.
          $ mkdir -p /etc/rancher/k3s/
# vi /etc/rancher/k3s/config.yaml
Add the following content:
          write-kubeconfig-mode: 644
token: "supasecret"
kube-controller-manager-arg: --allocate-node-cidrs
flannel-backend: none
disable: traefik
disable-network-policy: true
disable-kube-proxy: true
Don’t forget to change the token value, if you’d like a more secure token than what I wrote down. Now save and close the file. You can find most of these settings in the Cilium on K3s installation docs: https://docs.cilium.io/en/v1.9/gettingstarted/k3s/. However, I’ve also added the disable-kube-proxy: true setting, because I want Cilium to take care of all of the networking components. There’s no point in having a slower kube-proxy service. The other settings are for disabling the built in service load balancer, flannel, ingress controller (traefik) and the network policy controller. All of these tasks will be taken over by Cilium.
Install K3s
Now let’s start K3s:
$ curl -sfL https://get.k3s.io | sh -
Make sure the last line in the installer output is: ‘[INFO] systemd: Starting k3s ’ and that there are no errors after, nor that the terminal is stuck waiting for K3s to start. You can also check if the service is running by executing the following command:
service k3s status
Once the server has been deployed, deploy the agents. Go to the other two VMs and apply the following command:
$ curl -sfL https://get.k3s.io | K3S_URL='https://K3S_SERVER_IP:6443' K3S_TOKEN='supasecret' sh -
Of course make sure to change the token, if you’ve done so in the previous step and put in the IP address of the K3s server. You can go back to the machine running the K3s server and check if the nodes are coming online.
          $ kubectl get nodes
NAME         STATUS  ROLES                  AGE     VERSION
k8s-node-2   Ready   <none>                 4m58s   v1.23.8+k3s1
k8s-node-1   Ready   control-plane,master   10m     v1.23.8+k3s1
k8s-node-3   Ready   <none>                 4m51s   v1.23.8+k3s1
And check the running pods.
          $ kubectl get pods -A

NAMESPACE     NAME                                      READY   STATUS    RESTARTS   AGE
kube-system   local-path-provisioner-6c79684f77-zj895   0/1     Pending   0          8m39s
kube-system   metrics-server-7cd5fcb6b7-664pm           0/1     Pending   0          8m39s
kube-system   coredns-d76bd69b-hrnsk                    0/1     Pending   0          8m39s
Don’t worry about the pods stuck in ‘Pending’ or perhaps ‘ContainerCreating’, because that’s a feature, not a bug. We’ve removed the default Flannel network plugin, so the pods have no way of communicating to each other or the outside world. That’s what Cilium is for.
Install Cilium via its CLI
There are multiple ways of installing Cilium; with a Helm chart, with the Cilium CLI or with quick-install scripts. I’ve found that the Cilium CLI is amazingly awesome! So I would definitely recommend using that, where possible. It handles all of the resource creation, roles, service accounts, certificates, overwriting ConfigMaps and much more! Better yet, if you break anything and need to clean up, you won’t have to fiddle around and end up missing something. The CLI also cleans everything back up, so you can redeploy without any issues.
Before we install Cilium CLI, let’s prep the node by mounting the eBPF filesystem on all three nodes. After this step we will be mostly working out of the first K3s server node, as that node contains the kubectl client, which was installed by K3s.
$ sudo mount bpffs -t bpf /sys/fs/bpf
Run the following commands to install Cilium CLI:
          $ curl -L --remote-name-all https://github.com/cilium/cilium-cli/releases/latest/download/cilium-linux-amd64.tar.gz{,.sha256sum}
$ sha256sum --check cilium-linux-amd64.tar.gz.sha256sum
$ sudo tar xzvfC cilium-linux-amd64.tar.gz /usr/local/bin
$ rm cilium-linux-amd64.tar.gz{,.sha256sum}
Before we can deploy Cilium, we need to make sure that the cluster is known to the CLI. We can do that in a couple of ways, one of which is to set the KUBECONFIG variable and point it to the location where K3s generates the kubeconfig file.
$ export KUBECONFIG=/etc/rancher/k3s/k3s.yaml
We can test if the kubeconfig is correct by running:
cilium version
          $ cilium version

cilium-cli: v0.11.10 compiled with go1.18.3 on linux/amd64
cilium image (default): v1.11.6
cilium image (stable): v1.11.6
cilium image (running): unknown. Unable to obtain cilium version, no cilium pods found in namespace "kube-system"
We can see that the version deployed by the Cilium CLI was v1.11.6 and that it can’t find any cilium pods running in the cluster. This means that our kubeconfig has been set correctly and that we can proceed with the installation.
Deploy Cilium into the cluster
With the Cilium CLI installed, we can finally deploy Cilium as our network plugin, into our K3s cluster. To install Cilium, just run:
cilium install
It can take a minute for all three cilium pods to come online, so just hang in there. You should eventually get a similar output.
$ cilium install

🔮 Auto-detected Kubernetes kind: K3s
ℹ️  Using Cilium version 1.11.6
🔮 Auto-detected cluster name: default
🔮 Auto-detected datapath mode: tunnel
ℹ️  helm template --namespace kube-system cilium cilium/cilium --version 1.11.6 --set cluster.id=0,cluster.name=default,encryption.nodeEncryption=false,kubeProxyReplacement=disabled,operator.replicas=1,serviceAccounts.cilium.name=cilium,serviceAccounts.operator.name=cilium-operator,tunnel=vxlan
ℹ️  Storing helm values file in kube-system/cilium-cli-helm-values Secret
🔑 Created CA in secret cilium-ca
🔑 Generating certificates for Hubble...
🚀 Creating Service accounts...
🚀 Creating Cluster roles...
🚀 Creating ConfigMap for Cilium version 1.11.6...
🚀 Creating Agent DaemonSet...
level=warning msg="spec.template.spec.affinity.nodeAffinity.requiredDuringSchedulingIgnoredDuringExecution.nodeSelectorTerms[1].matchExpressions[0].key: beta.kubernetes.io/os is deprecated since v1.14; use \"kubernetes.io/os\" instead" subsys=klog
🚀 Creating Operator Deployment...
⌛ Waiting for Cilium to be installed and ready...
✅ Cilium was successfully installed! Run 'cilium status' to view installation health
As the last line recommends, let’s run:
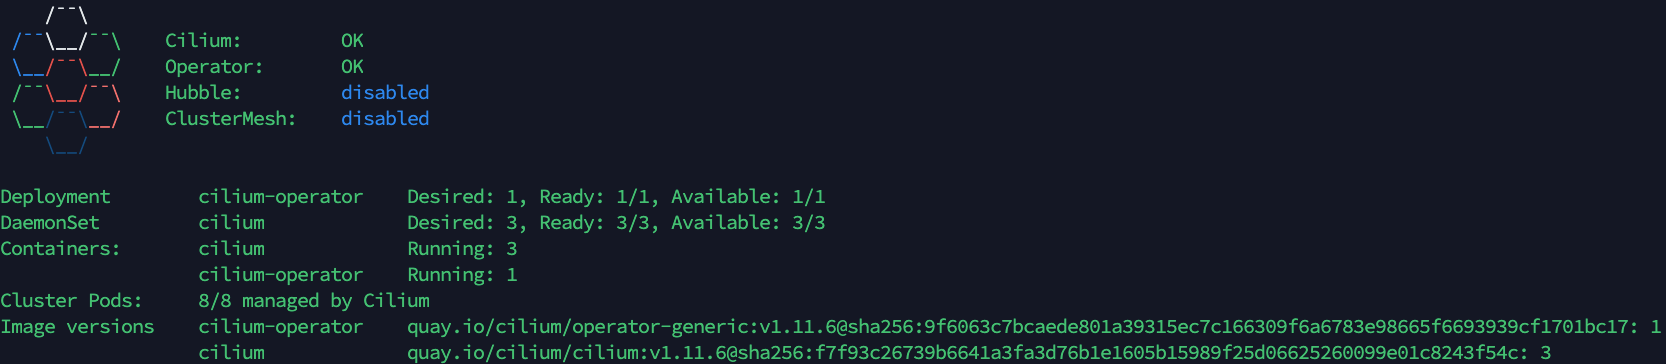
cilium status --wait
and you should see something similar to the screenshot below. I’ve added the
--wait
flag so the status only shows as soon as all pods are running.
Now if we check our pods, we should see that everything is up and running and that there are no ‘Pending’ pods.
   $ kubectl get pods -A

NAMESPACE     NAME                                      READY   STATUS    RESTARTS   AGE
kube-system   local-path-provisioner-6c79684f77-lnthp   1/1     Running   0          31m
kube-system   coredns-d76bd69b-mp596                    1/1     Running   0          31m
kube-system   metrics-server-7cd5fcb6b7-nrnq2           1/1     Running   0          31m
kube-system   cilium-operator-5d67fc458d-stb8k          1/1     Running   0          17m
kube-system   cilium-m9qgs                              1/1     Running   0          17m
kube-system   cilium-96cds                              1/1     Running   0          17m
kube-system   cilium-tk8mv                              1/1     Running   0          17m
Enable Hubble for observability
In order for us to observe what’s happening in our cluster, we will enable Hubble. Hubble is built on top of Cilium and eBPF and is a fully distributed networking and security observability platform. Hubble allows us to see what services are communicating with each other, what HTTP calls are being made, are any packets dropping and much more. Check out the docs for more info. https://docs.cilium.io/en/v1.11/intro/#what-is-hubble
All we need to do to enable hubble is run: cilium hubble enable
cilium hubble enable
   $ cilium hubble enable

🔑 Found CA in secret cilium-ca
ℹ️  helm template…
✨ Patching ConfigMap cilium-config to enable Hubble...
🚀 Creating ConfigMap for Cilium version 1.11.6...
♻️  Restarted Cilium pods
⌛ Waiting for Cilium to become ready before deploying other Hubble component(s)...
🚀 Creating Peer Service...
✨ Generating certificates...
🔑 Generating certificates for Relay...
✨ Deploying Relay...
⌛ Waiting for Hubble to be installed...
ℹ️  Storing helm values file in kube-system/cilium-cli-helm-values Secret
✅ Hubble was successfully enabled!
Now let’s also enable the UI, with:
cilium hubble enable --ui
   $ cilium hubble enable --ui

🔑 Found CA in secret cilium-ca
ℹ️  helm template…
✨ Patching ConfigMap cilium-config to enable Hubble...
🚀 Creating ConfigMap for Cilium version 1.11.6...
♻️  Restarted Cilium pods
⌛ Waiting for Cilium to become ready before deploying other Hubble component(s)...
🚀 Creating Peer Service...
✅ Relay is already deployed
✨ Deploying Hubble UI and Hubble UI Backend...
⌛ Waiting for Hubble to be installed...
ℹ️  Storing helm values file in kube-system/cilium-cli-helm-values Secret
✅ Hubble was successfully enabled!
All of the necessary resources have now been installed, but we can’t reach Hubble at the moment without using the kube-proxy command. However, Cilium CLI also manages that for you! All you need to do is run:
cilium hubble ui
   $ cilium hubble ui

ℹ️  Opening "http://localhost:12000" in your browser...
Of course this won’t work if you aren’t running K3s on your local machine, so replace ‘localhost’ with the IP address of the VM (if that’s what you’re using) you’re running this command from. For me, that looks something like the image below.

Deploy a simple Nginx service
You’re now pretty much set up to actually start messing around with Cilium! Let’s deploy a simple nginx example with a LoadBalancer service and see what happens. Create a file named
my-nginx.yaml
add the contents below and run:
kubectl apply -f my-nginx.yaml
 apiVersion: apps/v1
kind: Deployment
metadata:
  name: my-nginx
spec:
  selector:
    matchLabels:
      run: my-nginx
  replicas: 2
  template:
    metadata:
      labels:
        run: my-nginx
    spec:
      containers:
        - name: my-nginx
          image: nginx
          ports:
            - containerPort: 80
Now let’s create a service of type LoadBalancer and see what happens. Go ahead and create a file named
my-nginx-lb.yaml
add the contents below and run:
kubectl apply -f my-nginx-lb.yaml
  apiVersion: v1
kind: Service
metadata:
  name: my-nginx-lb
spec:
  selector:
    run: my-nginx
  ports:
    - protocol: TCP
      port: 80
      targetPort: 80
  type: LoadBalancer
Let’s check if a LoadBalancer service has actually been created.
  $ kubectl get svc -A

NAMESPACE     NAME             TYPE           CLUSTER-IP      EXTERNAL-IP                                    PORT(S)
default       kubernetes       ClusterIP      10.43.0.1       <none>                                         443/TCP
kube-system   kube-dns         ClusterIP      10.43.0.10      <none>                          53/UDP,53/TCP,9153/TCP
kube-system   metrics-server   ClusterIP      10.43.158.179   <none>                                         443/TCP
kube-system   hubble-relay     ClusterIP      10.43.45.21     <none>                                         80/TCP
kube-system   hubble-ui        ClusterIP      10.43.89.142    <none>                                         80/TCP
default       my-nginx-lb      LoadBalancer   10.43.225.175  192.168.10.222,192.168.10.223,192.168.10.224   80:30705/TCP
As you can see, the EXTERNAL-IP field has been populated and we can reach our service on the NodePort AND the external-ip with port 80.

Of course we don’t have MetalLB or Kube-vip deployed, so the actual external-ip allocation is done by K3s and its internal Klipper-LB, but Cilium does have a beta implementation of BGP, which uses an integrated MetalLB. https://docs.cilium.io/en/v1.11/gettingstarted/bgp/#bgp
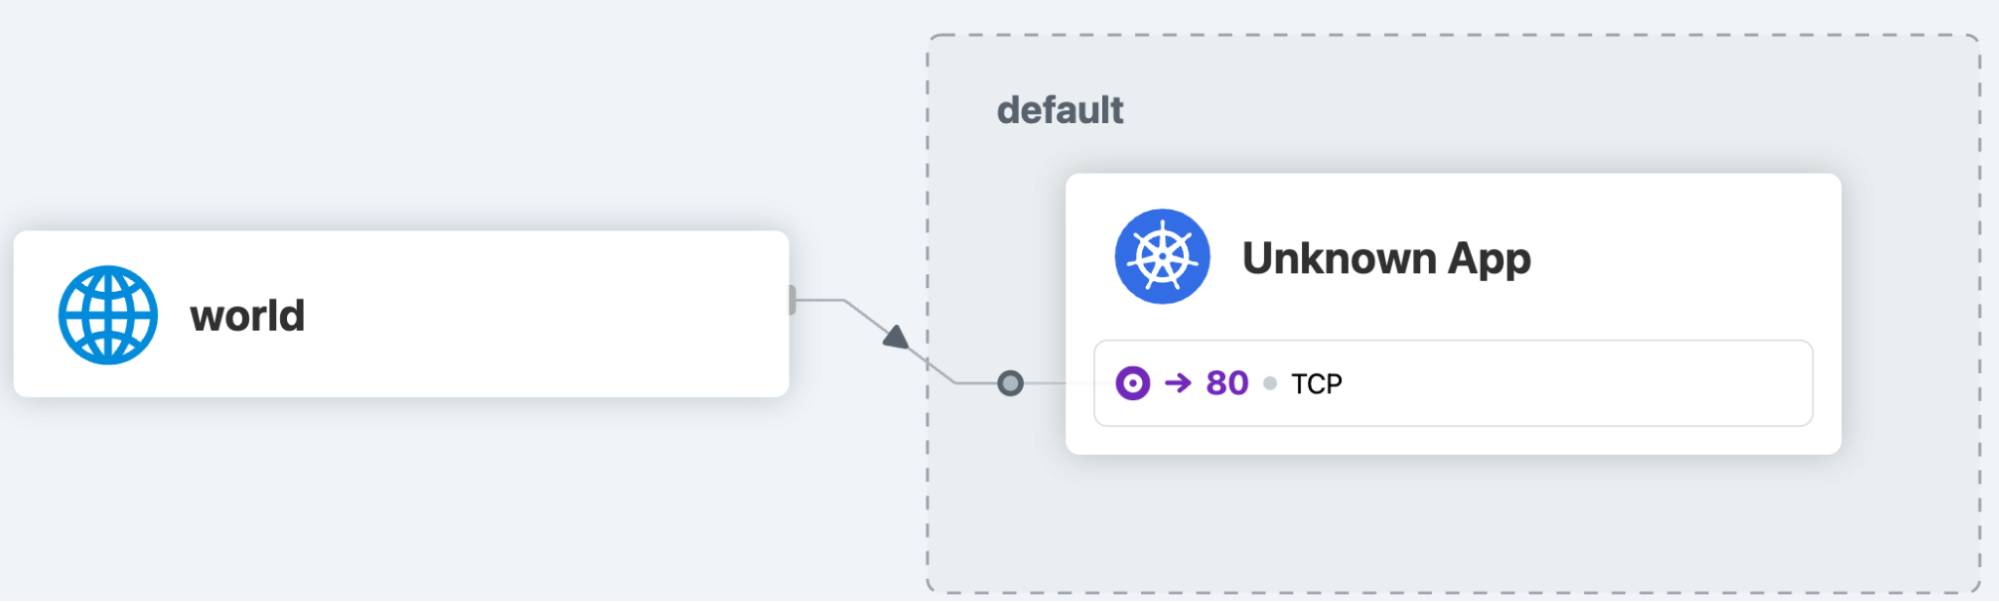
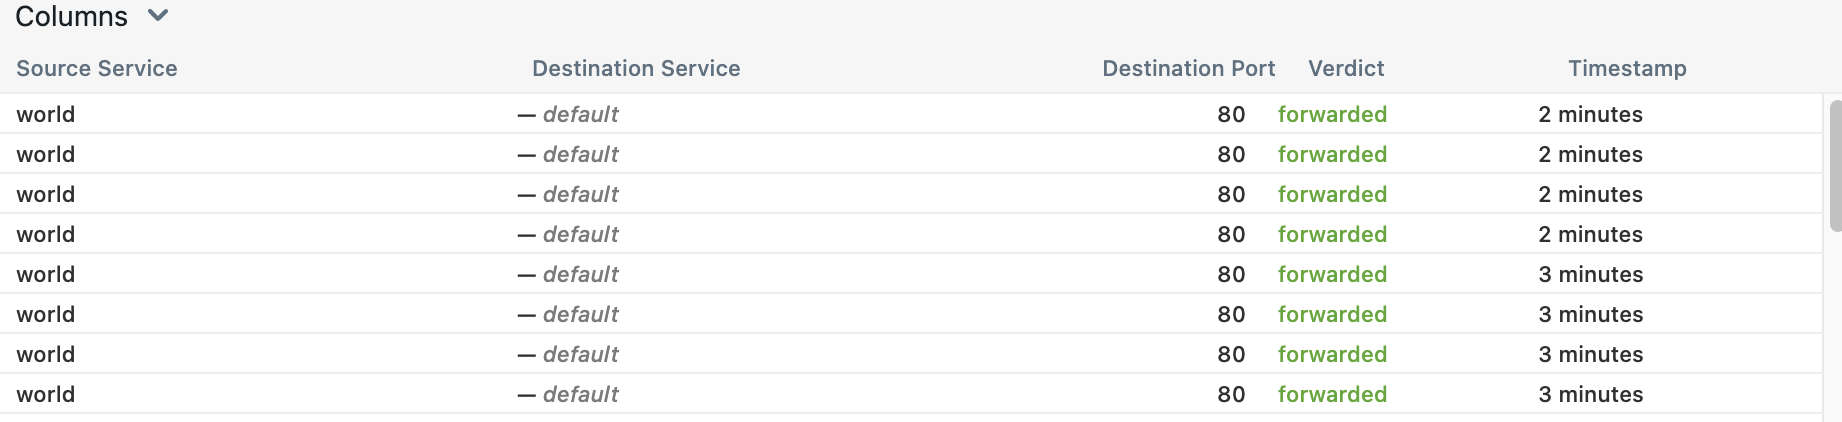
In Hubble we can see the communication happening for the my-nginx service.
Since it’s not that spectacular, I’ll run the
cilium connectivity test
command, just for a bit more wow factor. This will spin up a bunch of resources and test the connectivity between them, the outside world and with different policies. I’d recommend running this yourself as well, but don’t count on everything passing in one go.
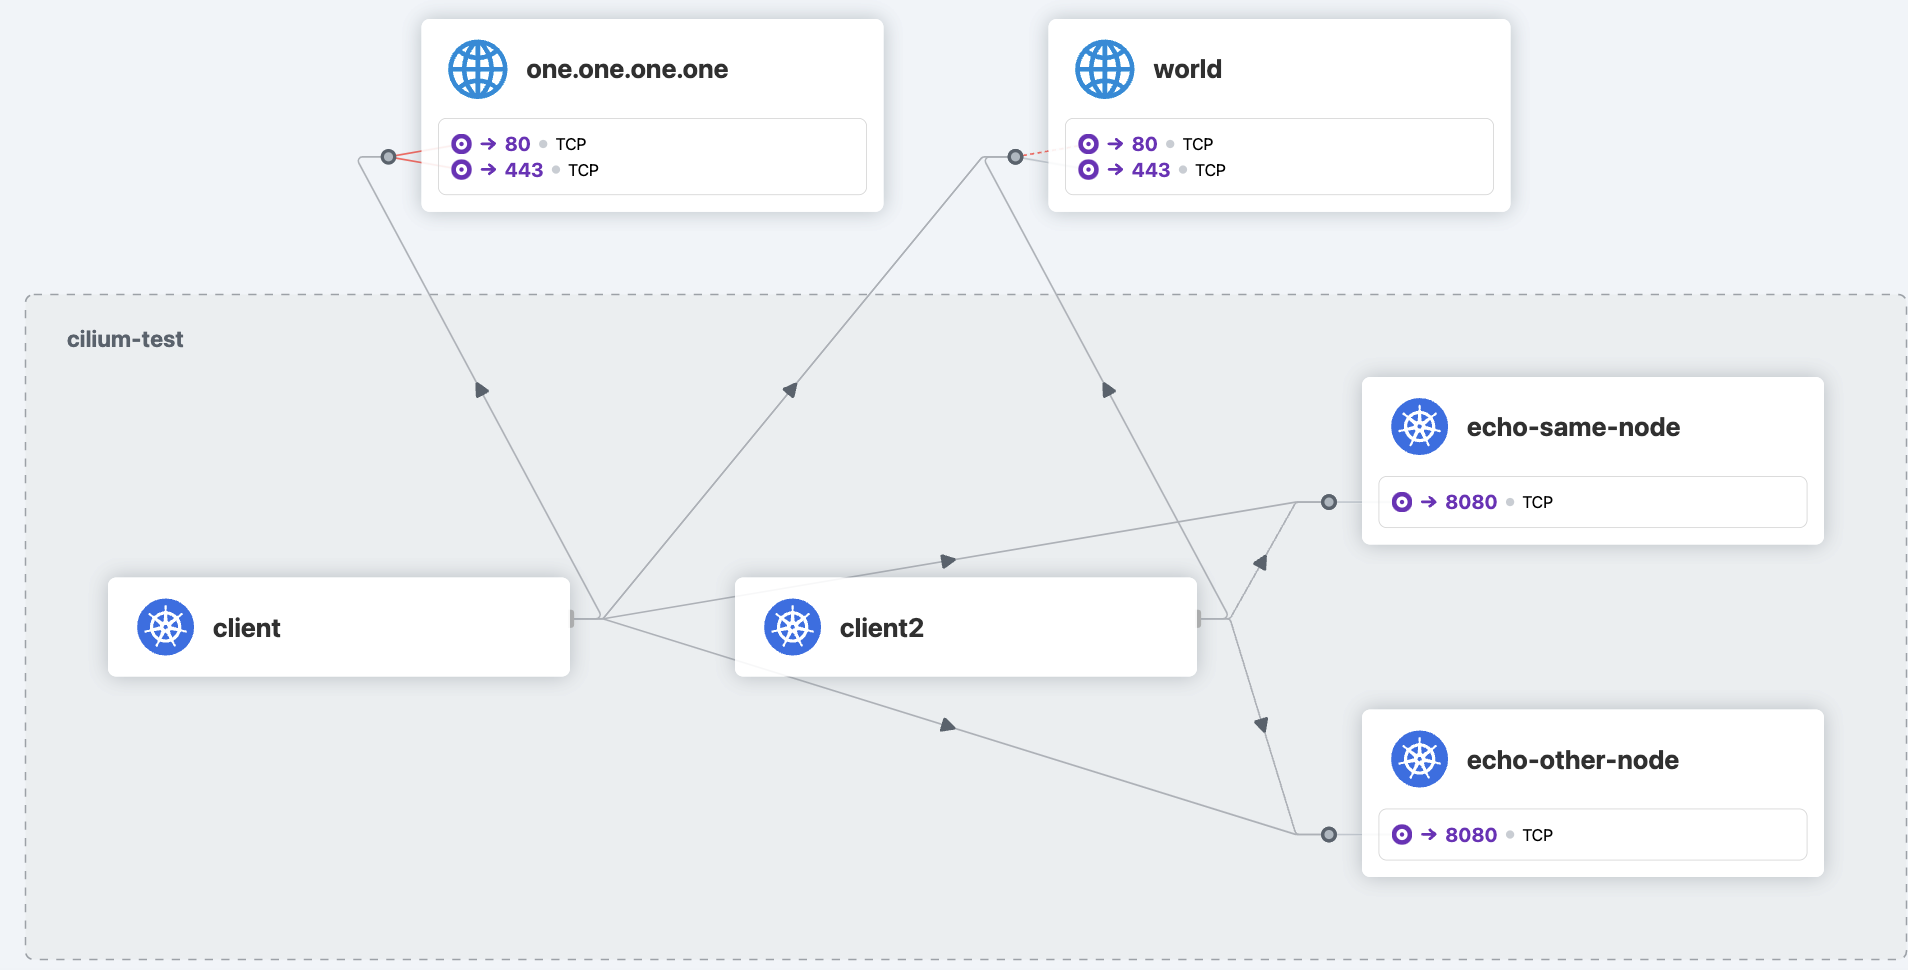
Replace this with the following image: 75-images/image12.png
There we go! That looks a lot more fun! 😁My advice is to check out the output and see what’s being tested. You can also find the test resources in github: https://github.com/cilium/cilium/tree/master/examples/kubernetes/connectivity-check
Final thoughts
We’ve barely scratched the surface of what we can do with Cilium, but now you have a bit of context and a small lab environment (at least, I hope you do) where you can test as much as you’d like.
If you would like to create a test environment without all of the hassle, I’d recommend trying out Spectro Cloud Palette. Palette allows you to simply select Cilium as your network plugin, while you define your Cluster Profiles and deploy your clusters on any infrastructure. This way you can create a blueprint (a Cluster Profile) that has Cilium as the default network plugin for any cluster you deploy. You can try Palette absolutely free.
As you have seen, we can use Cilium to replace many crucial networking components and make them even faster and easier to observe and secure. No more kube-proxy or iptables! That by itself, gets a gold star from me. ⭐️