


Portworx is a modern, distributed, cloud native storage platform designed to work with containers and microservice and so is a popular choice for storage management in Kubernetes. It abstracts storage devices to expose a unified, overlay storage layer to cloud-native applications. Portworx has a free license that comes with limited functionality and an enterprise license with full functionality.
You can deploy Portworx on the Kubernetes cluster using any of the following methods below
- Manifest
- Portworx operator
- Helm charts
In this blog, we will walk through the manifest approach on how to set up Portworx on a Kubernetes cluster deployed in VMware’s vSphere environment.
Pre-requisites
- Kubernetes cluster (with at least 3 workers)
- Kubectl
- Access to PX-Central
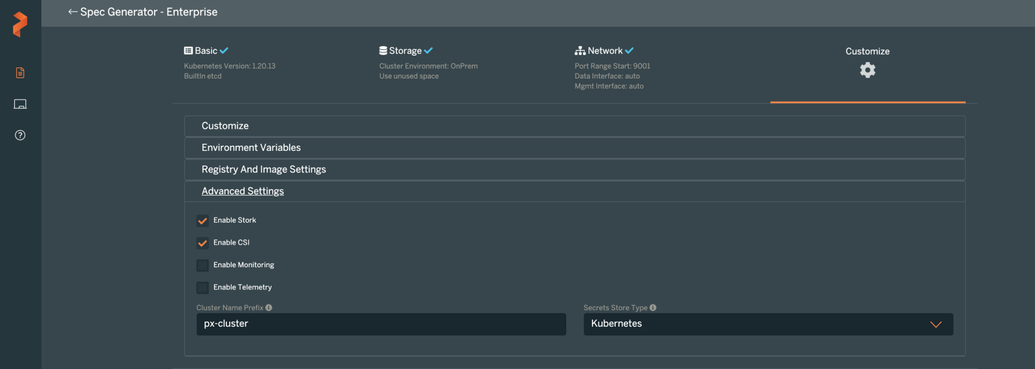
- Log in PX-Central, which is a web-based interface for generating Portworx spec. Select Portworx enterprise (which gives a 30-day trial) and fill in the additional fields matching your cluster. See below for the example values on how to generate a spec for Kubernetes cluster v1.20.13 for deployment on VMWare vCenter. As you can see in the screenshot below, Portworx provides a lot of options to customize like internal vs external ETCD, how you want to supply the disks to use, enabling stork, CSI & monitoring, etc.
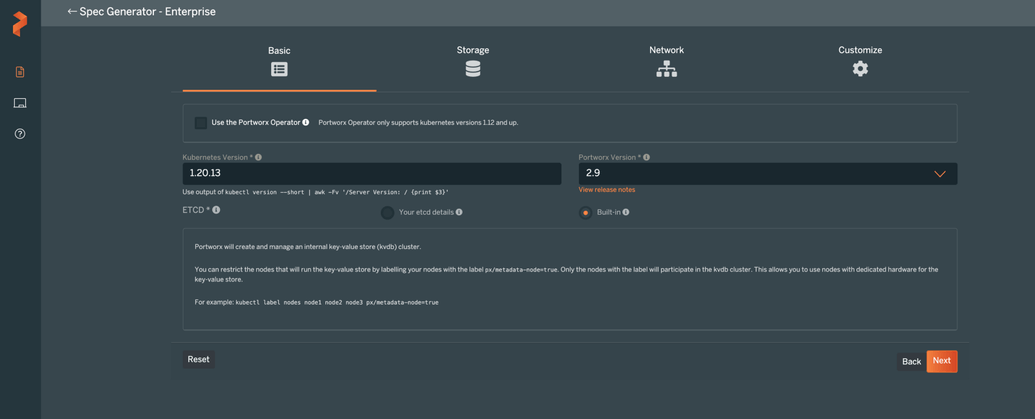
Basic Portworx settings

At this point, you can download the spec by clicking on the link provided. The spec generated will contain the following Portworx components:
- Portworx
- Autopilot
- Stork *
- CSI *
- Monitoring *
Note that components with * are included in the spec, only when they are enabled
- Generating spec through a curl endpoint:In the target cluster, create the secret that will contain the vsphere user credentials like shown below:
Create a secret that will have vcenter user credentials
apiVersion: v1
kind: Secret
metadata:
  name: px-vsphere-secret
namespace: kube-system
type: Opaque
data:
  VSPHERE_USER: YWRtaW5pc3RyYXRvckB2c3BoZXJlLmxvY2Fs
  VSPHERE_PASSWORD: cHgxLjMuMEZUVw==
Set the vSphere environment details:
# Hostname or IP of your vCenter server
export VSPHERE_VCENTER=spectrocloud.local

# Prefix of your shared ESXi datastore(s) names. Portworx will use datastores who names match this prefix to create disks.
export VSPHERE_DATASTORE_PREFIX=vsan-

# Change this to the port number vSphere services are running on if you have changed the default port 443
export VSPHERE_VCENTER_PORT=443

# Specify the size of the disk template to use for disk provisioning
export VSPHERE_DISK_TEMPLATE=type=zeroedthick,size=150
Note for disk template parameters
type: Supported types are thin, zeroedthick, eagerzeroedthick, lazyzeroedthick
size: This is the size of the VMDK in GiB
Generate the spec file using the commands below
# Find the kubernetes version of your cluster
export VER=$(kubectl version --short | awk -Fv '/Server Version: /{print $3}')

# Generate the px-spec file
curl -fsL -o px-spec.yaml "https://install.portworx.com/2.9?kbver=$VER&c=portworx-demo-cluster&b=true&st=k8s&csi=true&vsp=true&ds=$VSPHERE_DATASTORE_PREFIX&vc=$VSPHERE_VCENTER&s=%22$VSPHERE_DISK_TEMPLATE%22"
You could override any of the settings in the spec file at this point. Apply the px-spec generated on your kubernetes cluster by running
kubectl apply -f px-spec.yamlIn a few minutes, you should see portworx components getting deployed on the cluster. You can check the status of the portworx pods by running. Wait until the Pod goes to Running state.
$ kubectl get pods -o wide -n kube-system -l name=portworx
NAME READY STATUS RESTARTS AGE IP NODE NOMINATED NODE READINESS GATES
portworx-nsc4m 2/2 Running 0 34m 10.10.140.49 dev-vsphere-pwx-worker-pool-vsan-cluster-7bf4d49f4b-nldct <none> <none>
portworx-tc6xw 2/2 Running 0 34m 10.10.141.138 dev-vsphere-pwx-worker-pool-vsan-cluster-7bf4d49f4b-jfgl4 <none> <none>
portworx-xwbrz 2/2 Running 0 34m 10.10.138.67 dev-vsphere-pwx-worker-pool-vsan-cluster-7bf4d49f4b-vf7sk <none> <none>
Once the pods are ready, you can check the Portworx cluster status using the command below:
# Get the first portworx pod name
PX_POD=$(kubectl get pods -l name=portworx -n kube-system -o jsonpath='{.items[0].metadata.name}')

# Execute the pxctl binary to check cluster status
kubectl exec $PX_POD -n kube-system -- /opt/pwx/bin/pxctl status
pxctl is the go-to utility for almost anything in portworx.
For dynamic provisioning of volumes, use portworx provisoner in the storage class. An example is provided below.
apiVersion: storage.k8s.io/v1
kind: StorageClass
metadata:
  annotations:
    storageclass.kubernetes.io/is-default-class: "true"
  name: portworx-storage-class
parameters:
  priority_io: high
  repl: "3"
provisioner: pxd.portworx.com
reclaimPolicy: Retain
volumeBindingMode: Immediate
allowVolumeExpansion: true
apiVersion: storage.k8s.io/v1
kind: StorageClass
metadata:
annotations:
storageclass.kubernetes.io/is-default-class: "true"
name: portworx-storage-class
parameters:
priority_io: high
repl: "3"
provisioner: pxd.portworx.com
reclaimPolicy: Retain
volumeBindingMode: Immediate
allowVolumeExpansion: trueNote that this storage class is set as default.
With this storage class, any stateful applications deployed in the Kubernetes cluster should get volumes provisioned. Below is an example manifest to test the dynamic provisioning of volumes in the Kubernetes cluster:
apiVersion: v1
kind: PersistentVolumeClaim
metadata:
  name: example-pvc
spec:
  accessModes:
    - ReadWriteOnce
  resources:
    requests:
      storage: 1Gi
When the above resource is applied to the Kubernetes cluster, persistent volumes should get created and should be in Bound status.
This sums up the introduction of how to deploy Portworx using manifest for dynamic provisioning of volumes. Stay tuned for more!
Useful links:
- Data services for database containers & stateful containersRead the GigaOm Radar The foundation of The Portworx Storage Platform for Kubernetes Built from the ground up for…portworx.com
- Persistent storage for containersPortworx is persistent storage for containers. Get data services for stateful containers including HA, snapshots…central.portworx.com